Webflow With Cloudflare Proxy On (My New Kickass Method!)
Tutorial on using Cloudflare Proxy with a Webflow site using Cloudflare Workers.
I created a solution to make Webflow thrive with the Cloudflare proxy on (orange clouds).
And this post will walk you through using Cloudflare with Webflow!
Here's the summary of how it'll work:
- SSL on Webflow will be off
- Cloudflare will handle the SSL certificate
- Cloudflare Worker will update sitemap links to be https
- Cloudflare Worker will rewrite image links to leverage Image Resizing (optionally)

Why, Webflow. WHY!
Cloudflare is one of the greatest tools on the internet.
Webflow is pretty good, but misses the mark in a lot of ways.
That's why I started using Webstudio, a Webflow-like platform that is not only compatible with Cloudflare but is DEPLOYED to it enabling ludicrous speed.
I wrote up a comparison of Webflow and Webstudio if you want to see more.
What Happens When We Try Using Cloudflare With Webflow WITHOUT These Workarounds
In order to understand the workarounds we are implementing, I think it's important to understand what happens when we try using Cloudflare with Webflow without the workarounds.
Issue 1: SSL Certificate Fails to Generate or Renew
If we have SSL enabled on Webflow, and the Cloudflare proxy on, Webflow will not see the correct DNS records which will cause issues with SSL certificate renewal.
Here's how Cloudflare describes this phenomena:
"Because requests to proxied hostnames go through Cloudflare before reaching your origin server, all requests will appear to be coming from Cloudflare’s IP addresses."
You might thing to trick it by turning the Cloudflare proxy status off, generating the SSL certificate on Webflow, and then reenabling the proxy status. While it may appear to work in the short term, it'll one day stop working as the SSL cert will fail to renew and the connection will not succeed (you'll go through multiple SSL certificates in the span of a year).
Okay... so we need to disable SSL on Webflow!
Issue 2: Disabled SSL Outputs "http" Links in Sitemap
Your sitemap, which is an index of all the URLs on your website, will now output every link as plain old "http" (instead of "https").
This is not ideal for SEO (Google Search Console will let ya know, a lot).
That's because Google crawls your sitemap a bunch and will have to get redirected every link it crawls.
Don't piss off Google! (Feel free to piss of Bing or other search engines.)
Issue 3: Cloudflare Can't Access Images
Let's assume the first two issues are fixed (which they will be).
The last problem is that most of the Cloudflare performance magic won't happen because Webflow doesn't serve your images through your custom domain, rather a Webflow subdomain.
Cloudflare does it's magic on assets that go through your custom domain.
However, if you look at your image urls they look like this: https://uploads-ssl.webflow.com/
Those don't run through Cloudflare...
So let's talk about solutions!
3 Steps to Make Cloudflare Proxy Work With Webflow
Nough' about those issues, let's talk solutions!
Step 1: Add Rewrite Sitemap Links Cloudflare Worker
In this step, we are creating a Cloudflare Worker reverse proxy that will intercept all sitemap requests, modify the links to use "https", and return the updated sitemap.
Cloudflare Workers are freaking amazing. They let you run code such as JavaScript at the edge and it sits between the request for your website and the response of it. This lets you make modifications to the response, or request something completely different! Absolute game changer 💪
Here's how to do it:
- Head over to Cloudflare Workers (note, Cloudflare Workers exists at the root of your Cloudflare account, not on each individual website)
- Create one (I called mine something like "Webflow Sitemap Rewrite")
- Edit the code and paste in the following
export default {
  async fetch(request) {
    const response = await fetch(request)

    // Ensure we are dealing with an XML document.
    const contentType = response.headers.get('Content-Type')
    if (
      contentType.includes('text/xml') ||
      contentType.includes('rss+xml')
    ) {
      // Regex that matches all URLs (just the protocol portion) except those in the XML root.
      const regex =
        /http:\/\/(?!www\.w3\.org\/1999\/xhtml|www\.sitemaps\.org\/schemas\/sitemap\/0\.9)/g

      // Get a text version of the sitemap.
      let sitemapString = await response.text()

      // Swap out all matches with https.
      sitemapString = sitemapString.replaceAll(
        regex,
        'https://'
      )

      return new Response(sitemapString, {
        headers: response.headers,
      })
    } else {
      return response
    }
  },
}
Lastly, we need to tell Cloudflare which URLs to run this worker on. There are a couple ways to do this. Either go to Triggers when you are editing the Worker or go to Worker Routes when viewing your domain (they both change the same setting).
Add a route that is the following, except replace with your custom domain:
https://example.com/sitemap.xml
Screenshots of My Working Sitemap
Here's Google Search Console with a successful crawl:
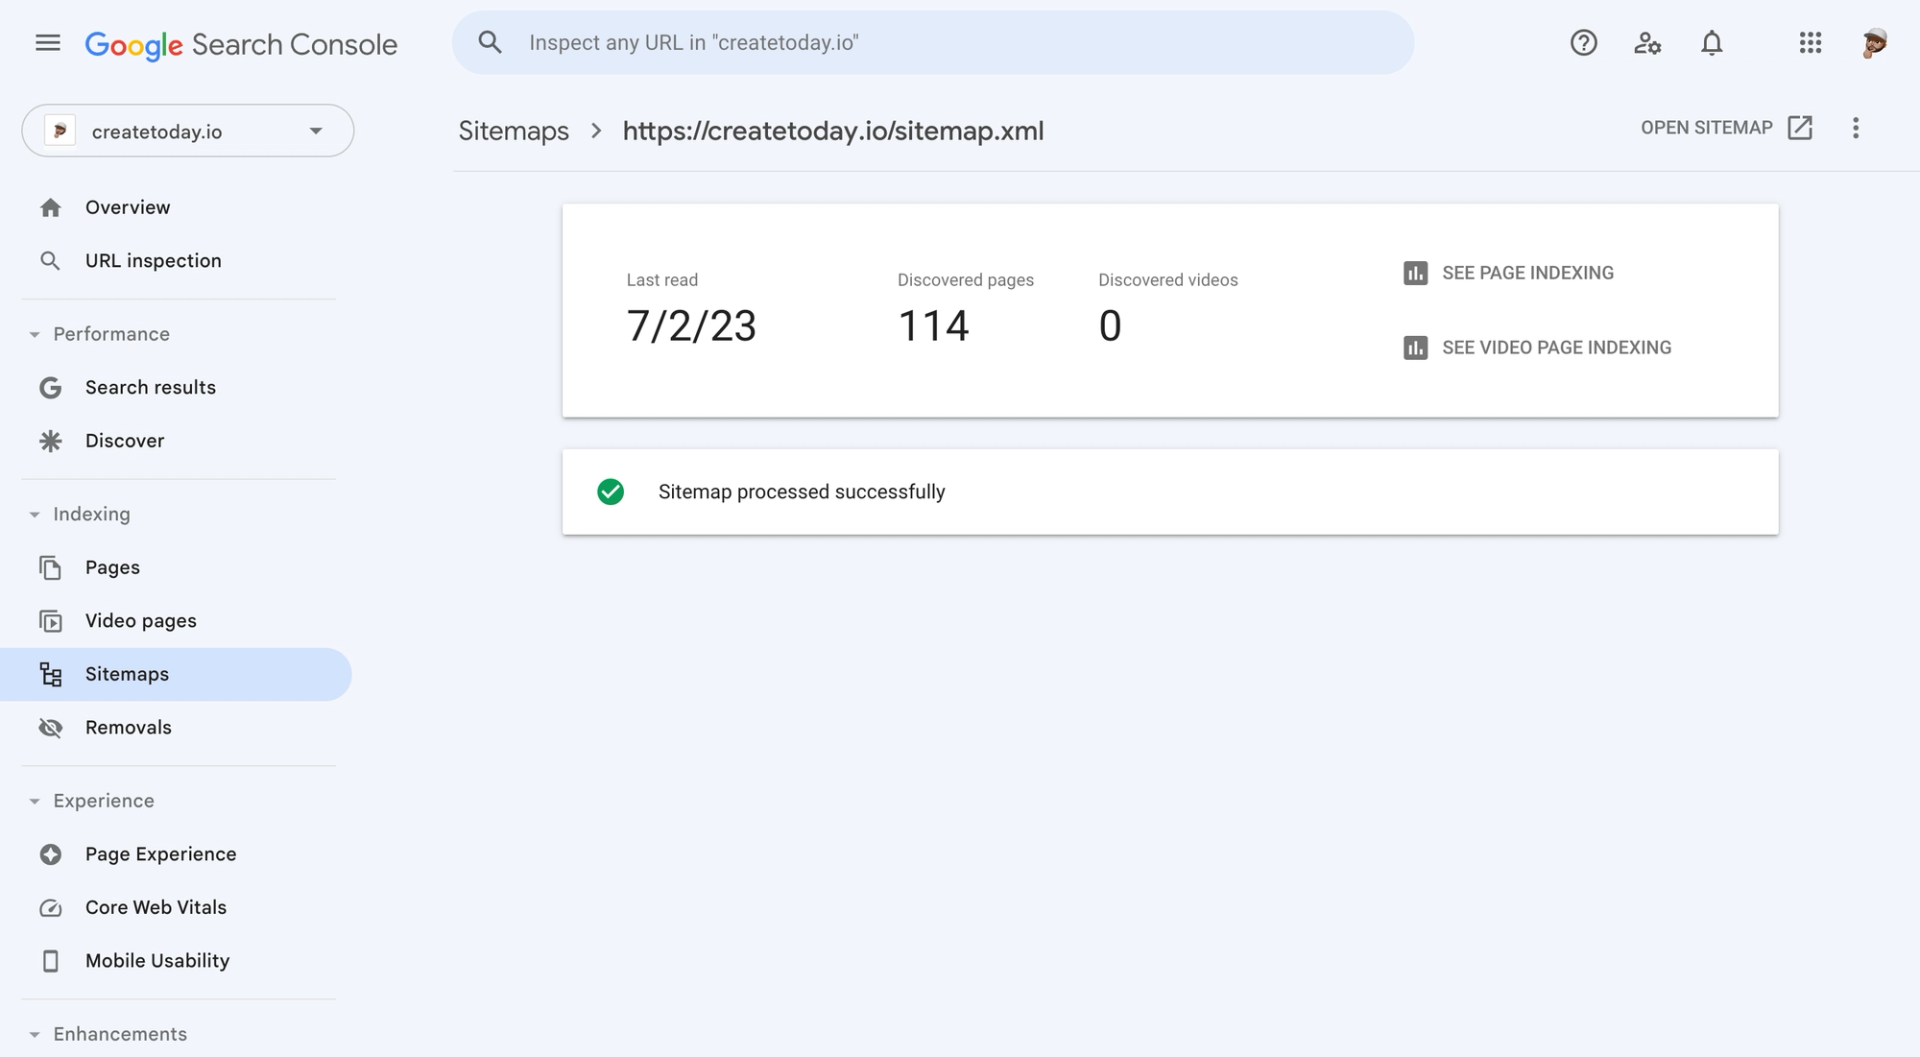
And here's my XML sitemap (note all the custom domain links are https because of the reverse proxy):
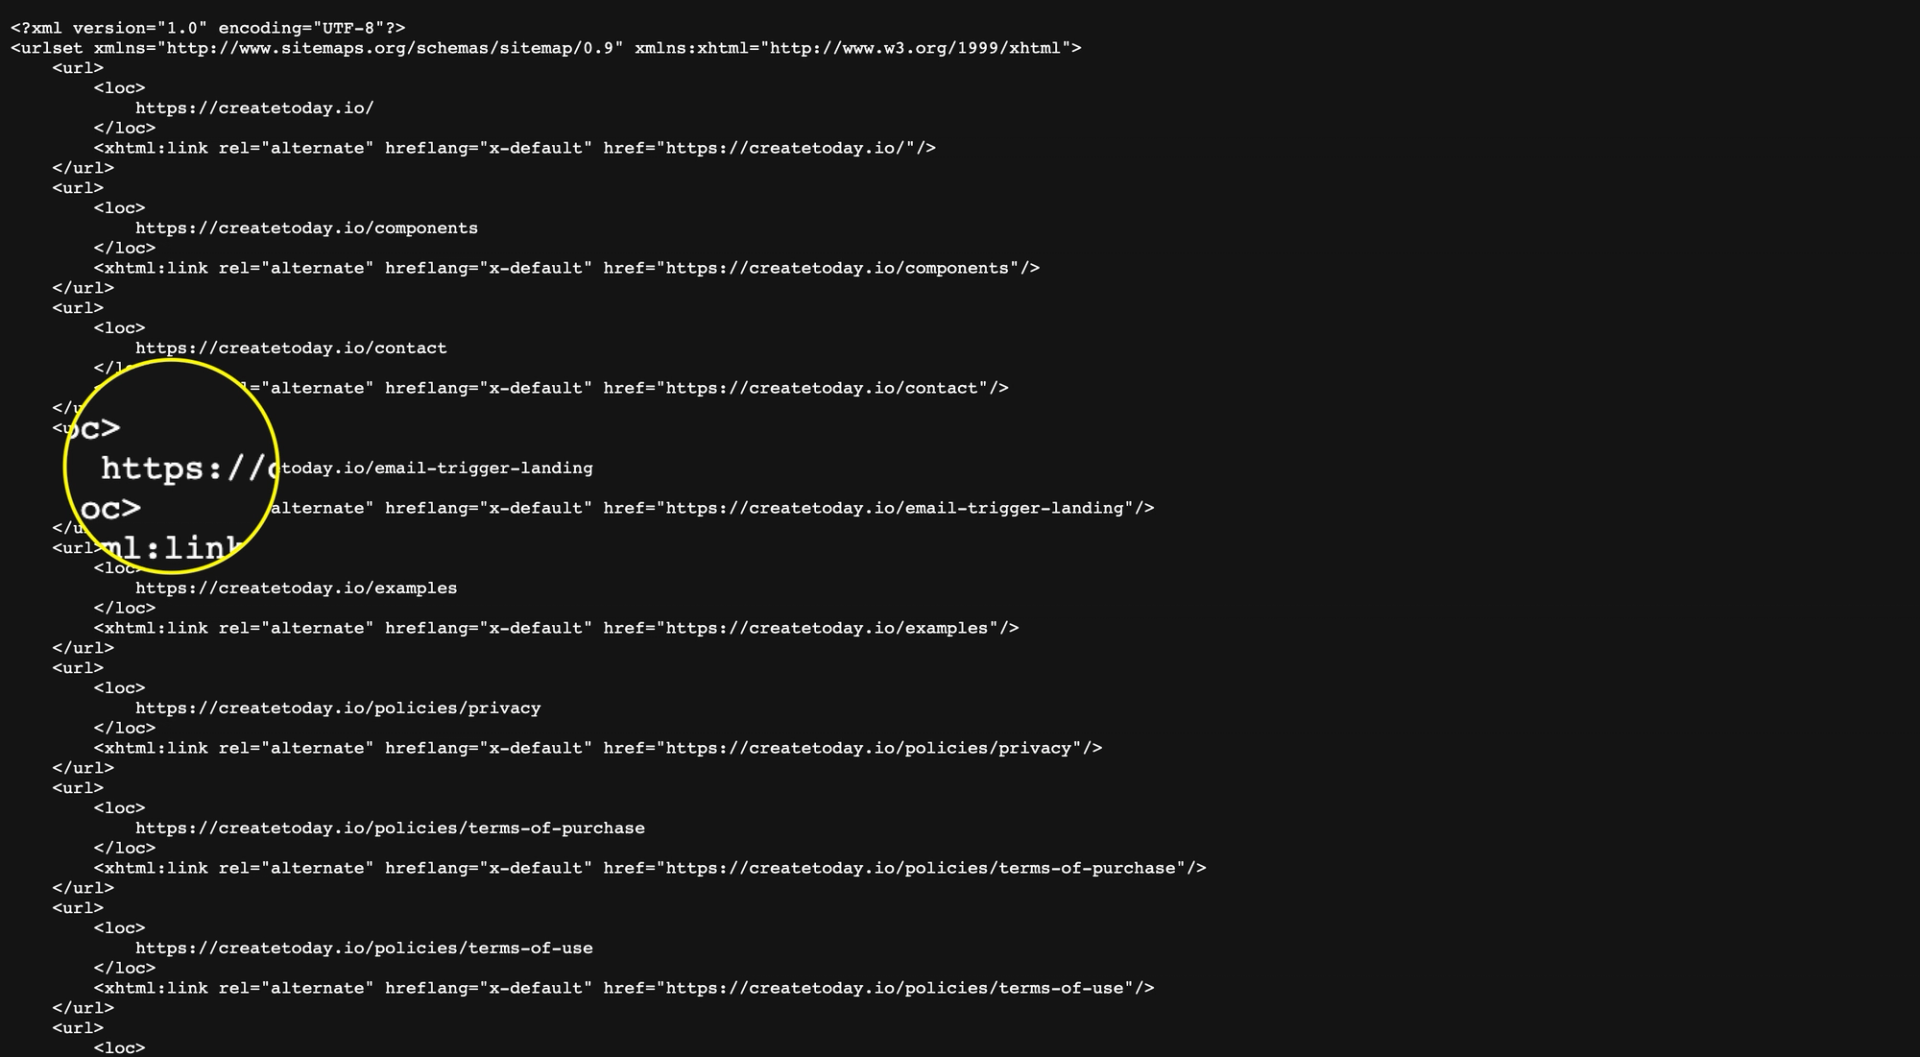
Once we disable SSL on Webflow and modify the Proxy Status to "Proxy", we'll check the sitemap to ensure this Worker is doing what it should.
Step 2: Modify Asset URLs (Optional)
We need to set up another reverse proxy that will intercept all pages and update the HTML image references.
If you make money with your Webflow site, it's totally worth it to buy Cloudflare Pro for like $25/month.
One of the features is the ability for Cloudflare to resize, compress, and serve your images at the edge as WebP.
My blog is very image heavy, so signing up for Pro was a no brainer.
"No wonder your images are loading so fast." I know, right?
Here's what to do (again, optional):
- Buy Cloudflare Pro
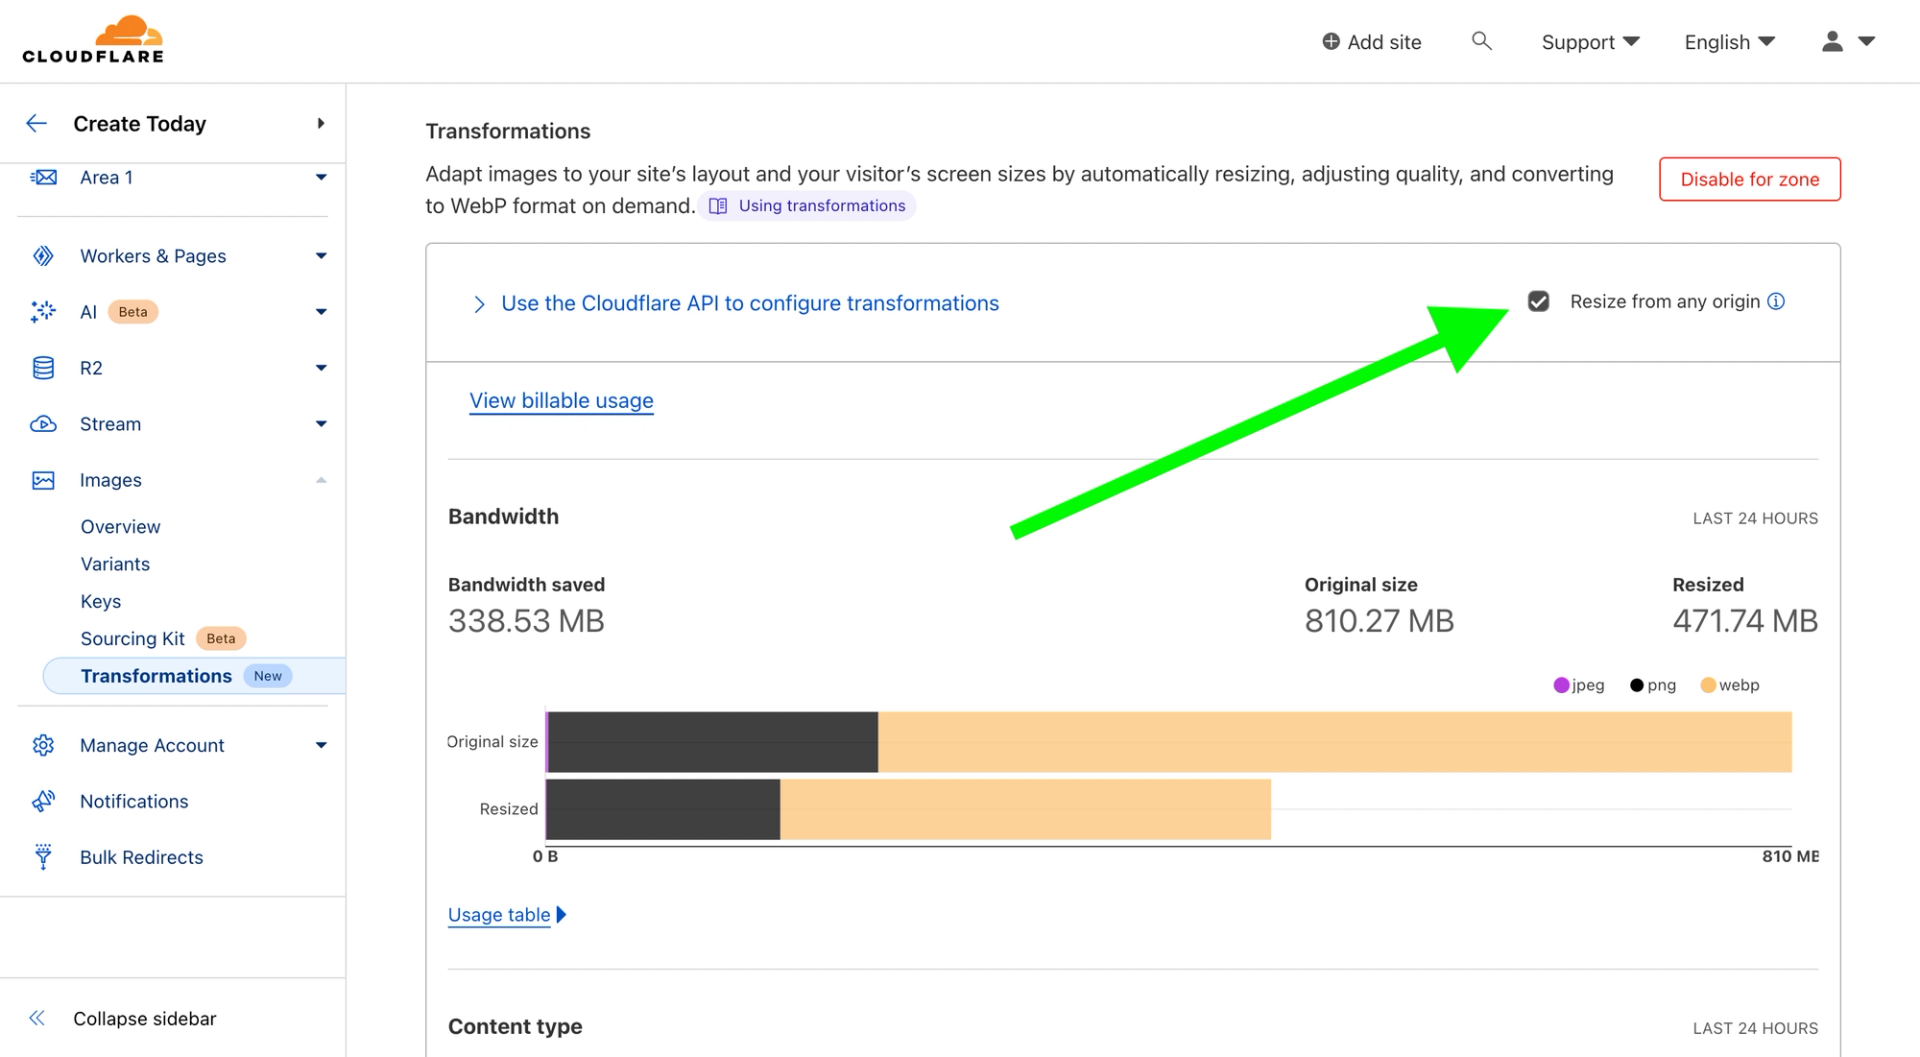
- Enable Image Resizing (Speed > Optimization > Image Resizing)
- Enable "Resize from any origin" because we are passing in Webflow urls (Note: this is an updated step that wasn't needed before, if your images are breaking, you likely haven't enabled this)
- Add another Cloudflare Worker
- Paste in the following code
export default {
  async fetch(request, env) {
    return await handleRequest(request)
  },
}

async function handleRequest(request) {
  const response = await fetch(request)
  const contentType = response.headers.get('content-type')

  // Only modify HTML responses
  if (contentType && contentType.includes('text/html')) {
    const modifiedResponse = new HTMLRewriter()
      .on('img', {
        element: (element) => {
          const src = element.getAttribute('src')
          const srcset = element.getAttribute('srcset')
          if (
            src &&
            !src.toLowerCase().endsWith('.svg') &&
            !src.toLowerCase().endsWith('.gif')
          ) {
            const width = element.getAttribute('width')
            const modifiedSrc = modifyURL(src, width)
            element.setAttribute('src', modifiedSrc)
          }

          if (
            srcset &&
            !src.toLowerCase().endsWith('.svg') &&
            !src.toLowerCase().endsWith('.gif')
          ) {
            const modifiedSrcset = modifySrcset(srcset)
            element.setAttribute('srcset', modifiedSrcset)
          }
        },
      })
      .transform(response)

    return modifiedResponse
  }

  return response
}

function modifySrcset(srcset) {
  const srcsetEntries = srcset.split(',')
  const modifiedSrcsetEntries = srcsetEntries.map(
    (entry) => {
      const [src, size] = entry.trim().split(' ')
      const width = size.endsWith('w')
        ? size.slice(0, -1)
        : size
      const modifiedSrc = modifyURL(src, width)
      return `${modifiedSrc} ${size}`
    }
  )

  const modifiedSrcset = modifiedSrcsetEntries.join(',')
  return modifiedSrcset
}

function modifyURL(url, width) {
  const modifiedURL = `/cdn-cgi/image/fit=contain,format=auto,width=${width}/${url}`
  return modifiedURL
}
The purpose of this Worker is to look for every "src" and "srcset" on the page (aka images and responsive images) and modify the URL.
The final URL will look something like this: '/cdn-cgi/imag/{options}/{originalURL}'
The start of that URL auto triggers a Cloudflare service to handle the images.
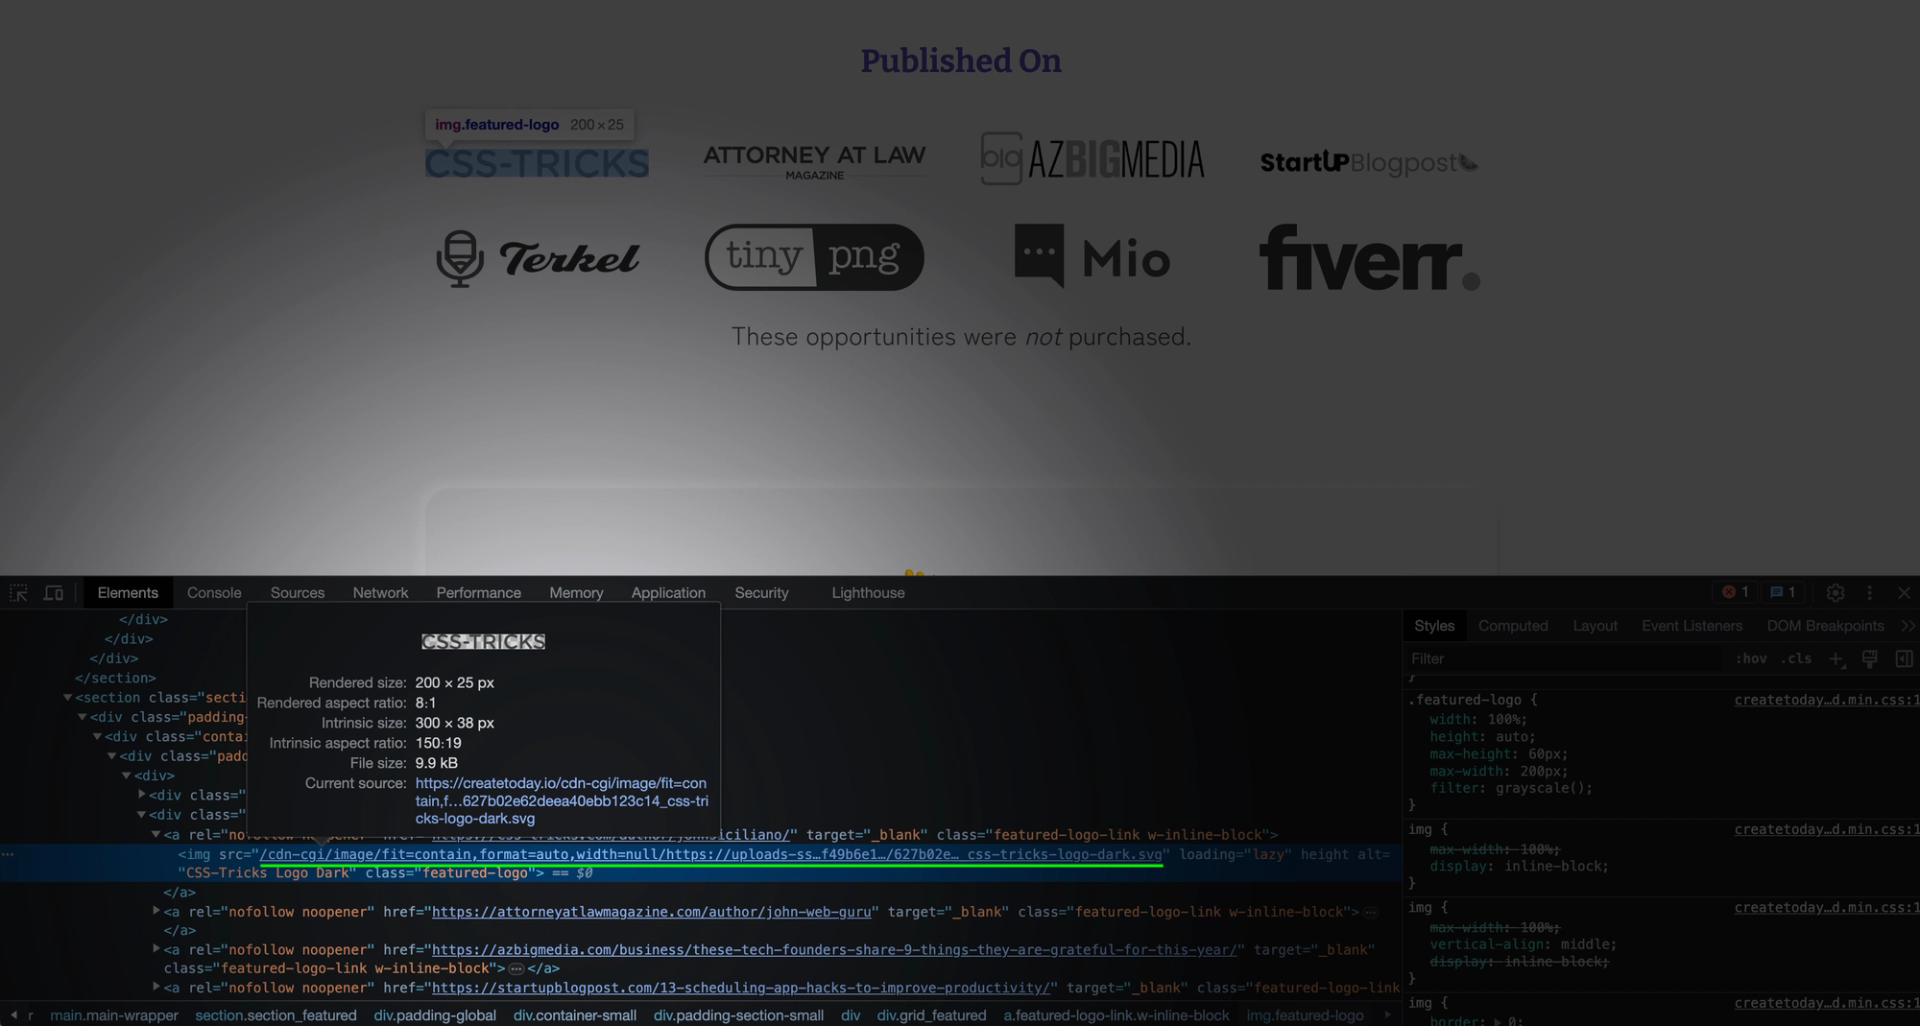
Lastly, tell Cloudflare which URLs (or routes) you want this worker to run on. I have it running on every URL like this "https://createtoday.io/*". The asterisk is a wild card, matching any and all paths.
Once we disable SSL on Webflow and modify the Proxy Status to "Proxy", we'll check the images to ensure this Worker is doing what it should.
Step 3: Use Only Cloudflare's SSL
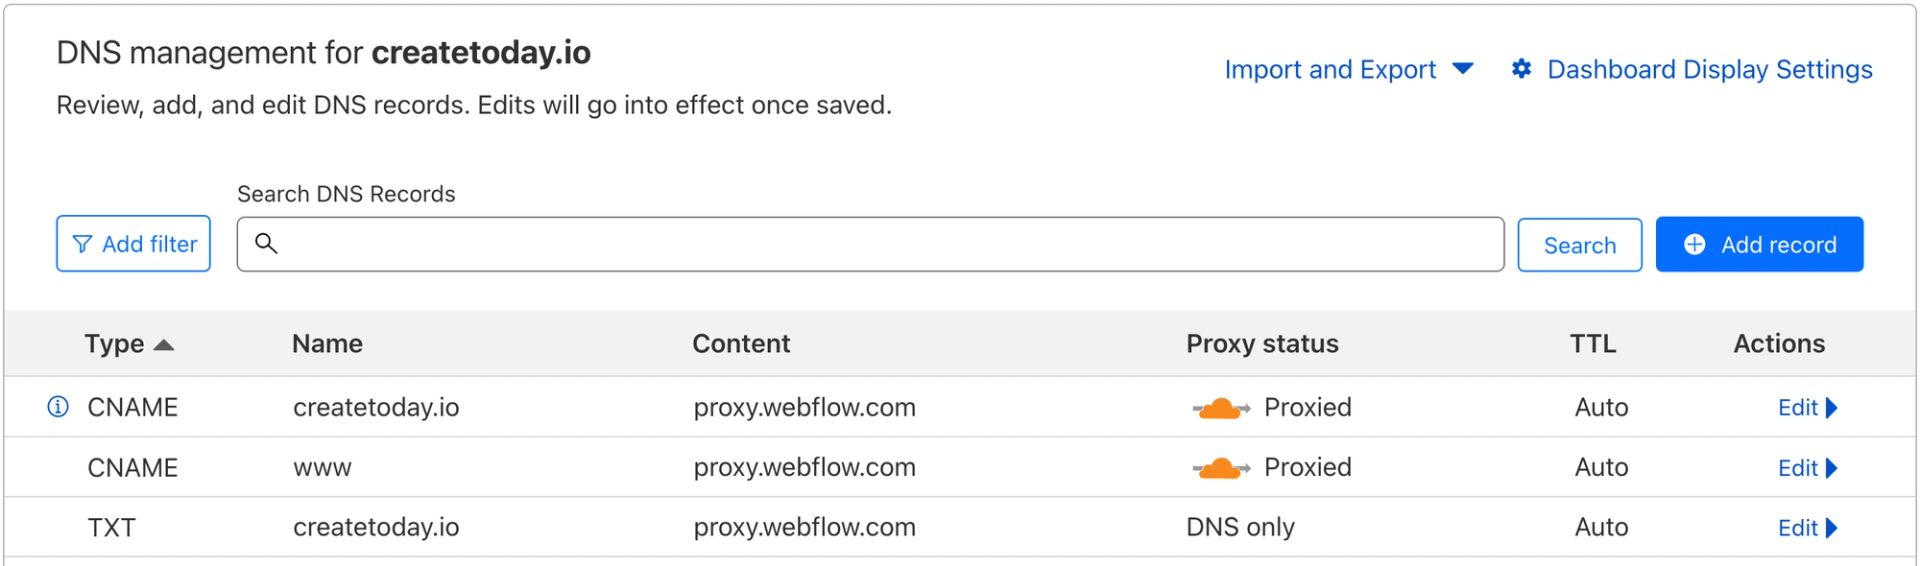
Last, and most importantly, we need to modify the DNS records to point your domain to Webflow using the non-ssl DNS records.
You'll find these record by disabling SSL in Webflow (or in their docs). And I'll add them right here too!
Serving a Bare/Naked Domain (NO www):
You'll need to create two CNAME records and one text record. Here they are:
- Create a CNAME record with the hostname @ and the value proxy.webflow.com
- Create a CNAME record with the hostname www and the value proxy.webflow.com
- Create a TXT record with the hostname @ and the value proxy.webflow.com (site note, WTF does this do? IDK, but they said add it 🤷♂️)
- And then in your Webflow publishing settings, set the naked domain as the default ("Make Default")
Note, the above are NOT using proxy-ssl.webflow.com as that is reserved for using SSL on Webflow.
Serving a www Subdomain:
You'll need to create two A records and one CNAME record. Here they are:
- Create an A record with the hostname @ and the value 23.235.33.229
- Create an A record with the hostname @ and the value 104.156.81.229
- Create a CNAME record with the hostname www and the value proxy.webflow.com
Pull up your Cloudflare account and go to DNS before turning off SSL on Webflow so you can minimize or eliminate downtime.
- First, set the SSL mode in Cloudflare to "Full"
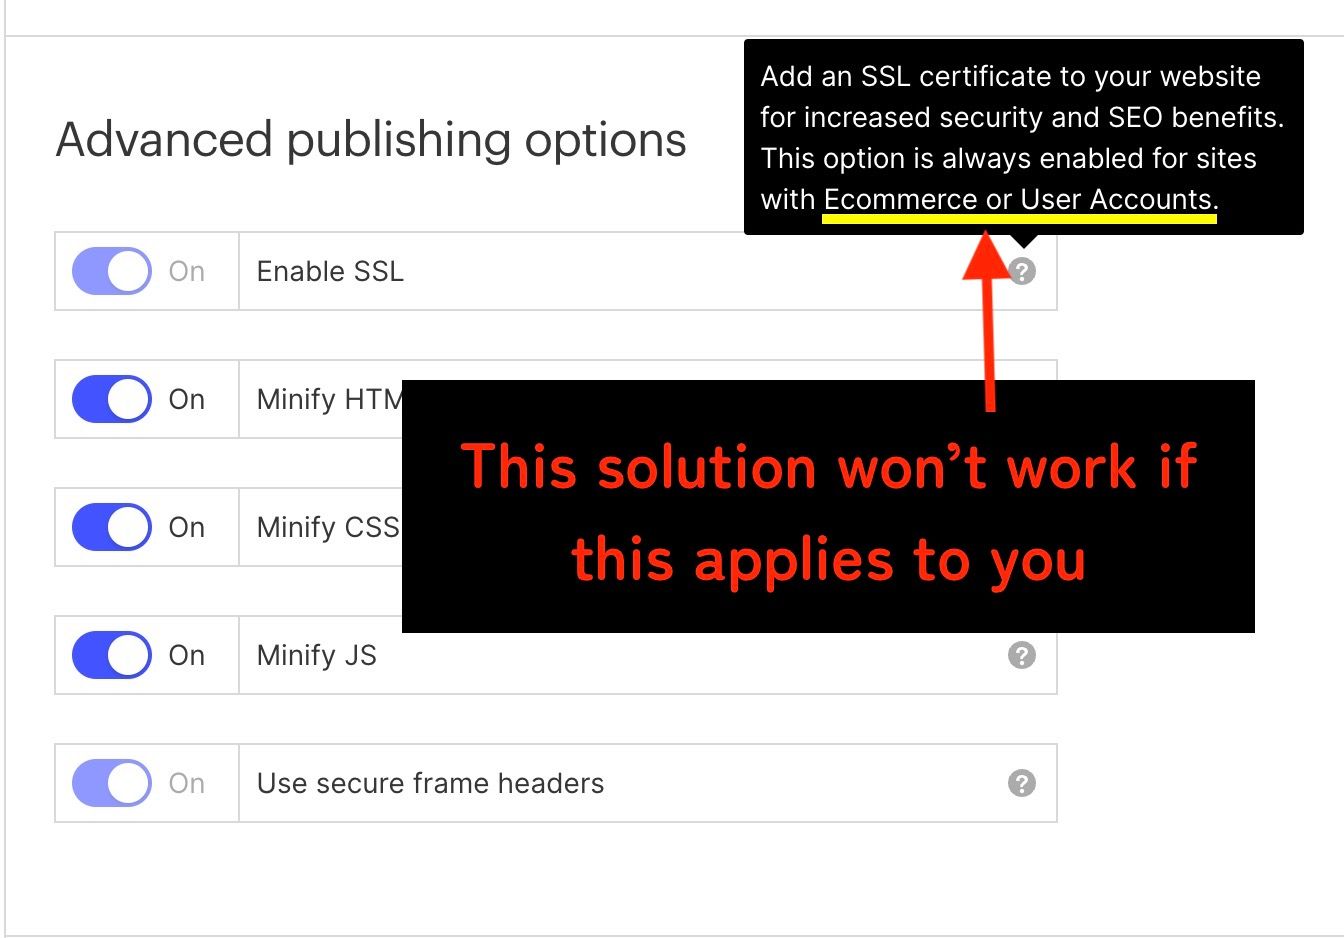
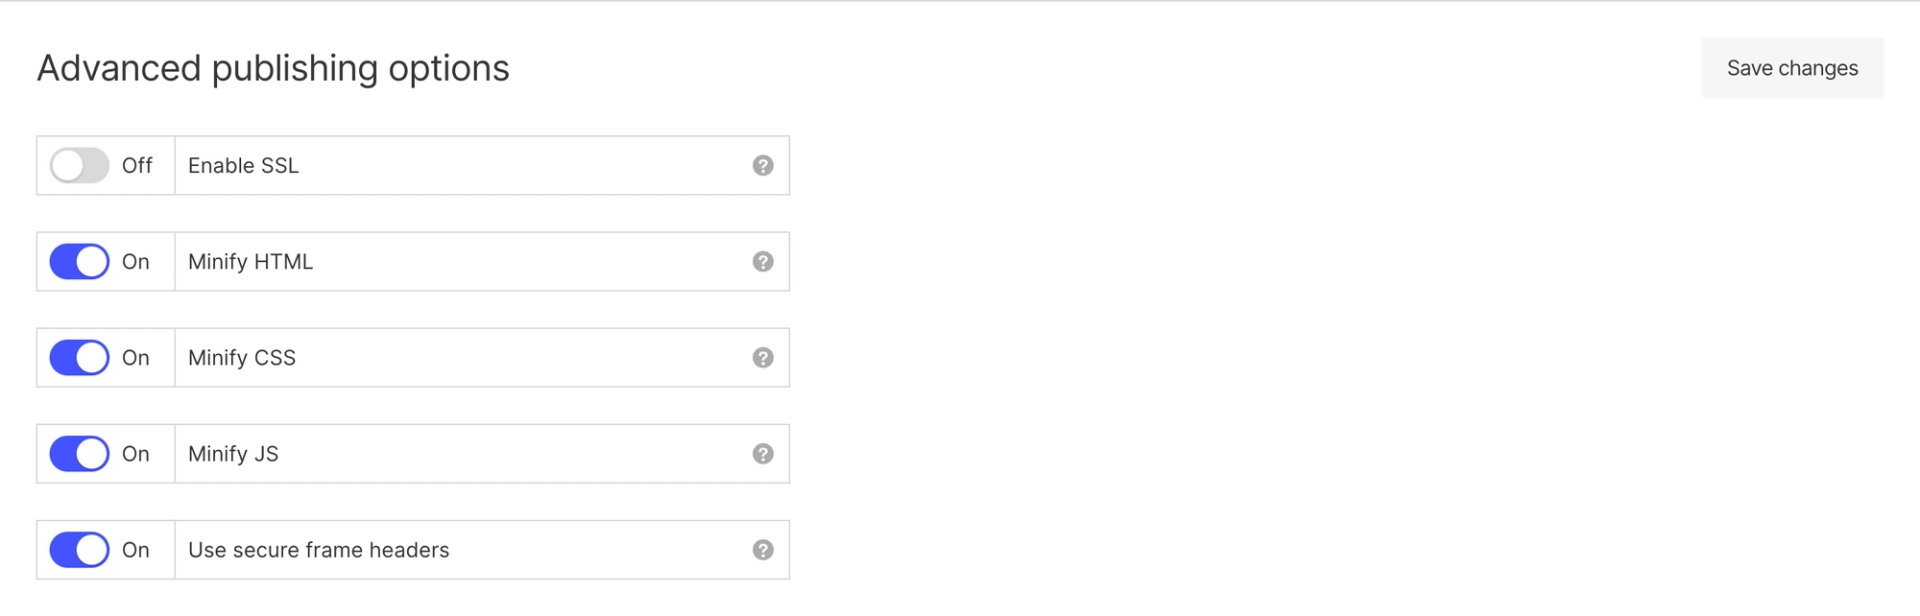
- Disable SSL in Webflow (go to Settings > Publishing > Scroll to Advanced Publishing Options)
- Modify your DNS records to match whatever Webflow gives you
- Enable Cloudflare proxy (making the cloud orange under Proxy Status)
- Publish Webflow
Test! Test! Test!
Now everything should be firing (sometimes DNS takes a few hours to pick up, but my experience with Cloudflare is it happens right away).
I'd open a new private/incognito window to test your site.
Test Your Sitemap – Head over to your website /sitemap.xml and search for your domain name and ensure that all your domain links are using https.
Test Your Images – First of all make sure your images are loading. The first time they load they might take a second to generate. Inspect your images (or open them in a new tab) and ensure they are using the URL format defined in Step 2 (if you did this step).
And just click around. Make sure things look good.
Once your confirm that, let's move onto the last part of the post which is adjusting the Cloudflare settings to give you the best performance and security.
The Best Cloudflare Proxy Settings for Webflow
You might be wondering, "what the heck do I turn on and leave off?"...
I gotchu! I'll share exactly how my site is setup.
Under Speed > Optimization, enable the following:
- HTTP/2 – The cool new way websites talk to your browser, making them faster and more efficient.
- HTTP/3 – The future of web communication, faster than a cheetah on roller skates.
- HTTP/2 to Origin – A secret handshake between your server and Cloudflare for super speedy connections.
- Enhanced HTTP/2 Prioritization – A fancy way of saying "we make sure your website loads smoothly and without hiccups".
- Brotli – Secret sauce to compressing data and serving it up faster than your desire to proxy Webflow traffic through Cloudflare.
- 0-RTT Connection Resumption – Think of it as a VIP pass that lets you reconnect to a website lightning fast.
- Always use HTTPS – Making sure your connection is secure and encrypted.
- TLS 1.3 – The Fort Knox of internet security, keeping your data safe and sound.
- Early Hints – Gives your browser a sneak peek of what's coming up, so it can start loading stuff in advance.
- Auto Minify (JavaScript, HTML, CSS) – Reduce the file size of source code on your website (I think Webflow already does this, but using Cloudflare's might do some additional stuff).
Under Caching > Configuration, enable the following:
- Crawler Hints – They provide special clues to web crawlers, helping them understand and index your website more effectively.
Under SSL > Edge Certificates, enable the following:
- Always Use HTTPS – Ensuring your visitor data is always protected with encryption.
- Opportunistic Encryption – Take every chance to encrypt your data, even if it's not mandatory, for an extra layer of security.
- TLS 1.3 – The latest and greatest in secure communication protocols, keeping your online interactions safe and encrypted.
Those are all the settings I think most Webflow sites should enable. There are other settings like Always Online™ that are optional.
The settings above should give you all the best performance and security settings.
More Info About the Cloudflare Webflow Setup
- The added Cloudflare Workers add virtually no difference to how fast the website loads. The Workers add around 5ms to each request.
- Cloudflare Workers are free up to 100,000 requests per day. After that it's pay-as-you-go starting at $5/month.
- Serving a bare domain (no www subdomain) is made possible via CNAME flattening (docs on that if you're interested in learning more about CNAME flattening)
Why I Created This Instead of Using the Milk Moon Studio Approach
Hats off to the team at Milk Moon Studio who created the first solution to using Cloudflare with Webflow.
But why this new method over theirs?
I wanted something that uses native Cloudflare and Webflow features instead of relying on a third party (such as the Cassette app). While there's nothing wrong with it, I figured why not use built-in Cloudflare stuff.
Milk Moon Studio mentioned in their article the idea of the approach I created, but preferred doing it with the app as it's a no-code solution. Fair point!
I don't think there is a right or wrong way solution between the two, rather just varying approaches.