Webstudio.is + Cloudflare: A Guide On Launching and Configuring
How to launch Webstudio with Cloudflare, the best settings to enable (and leave off), and some other tidbits of helpful info.
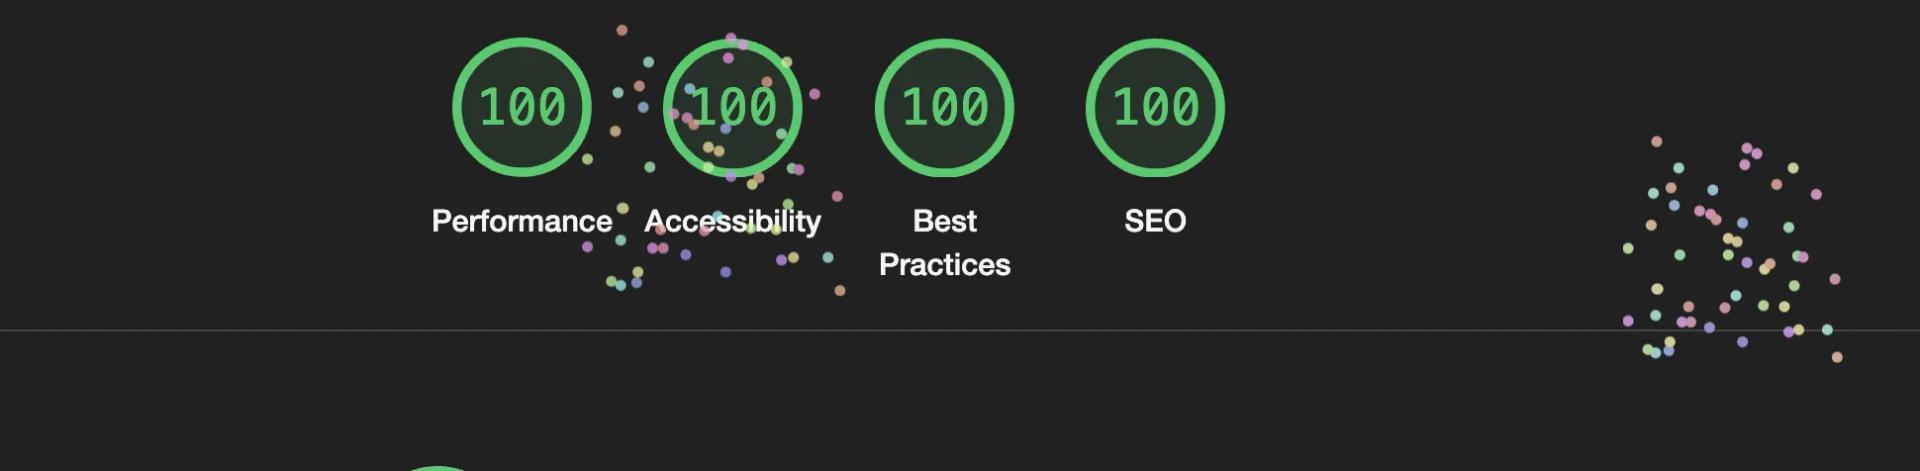
Webstudio and Cloudflare are two tools that help me build websites more efficiently, secure, and deliver them to visitors with 100/100 Lighthouse scores.
But most people don’t understand WTF DNS is or which one to use.
So for those of you who use GoDaddy, or any other provider besides Cloudflare, and are using Webstudio, this guide is for you.
And for those of you who want to bake SEO into the foundation of Webstudio and go from zero to complete website, check this out.
In this guide, I’ll share with you:
- Why Cloudflare is the best option for your DNS
- WTF DNS is in simple terms
- How to launch your Webstudio site with Cloudflare
- And how to configure Cloudflare to pair perfectly with Webstudio
Cloudflare is better than every alternative
If you’re not already using Cloudflare, do it.
It’s not only free, but it is quite literally the fastest, most secure, and feature rich way to manage your DNS and stuff (I’ll define this).
If you’ve only managed DNS with GoDaddy, Hostinger, or any of the other tier Z platform, you may think, “What’s the big deal, DNS just points my domain to my server, how can one platform do that better than another?”…
And I’d say, you’re kind of right.
When you choose a platform for this DNS stuff most us don’t understand, you’re really asking it to do three things.
1. Sell you a domain (for a good price)
When you buy a domain, you are purchasing it from a domain registrar.
When you do DNS stuff you are using… DNS.
Domain registration and DNS can be done through two separate platforms but are often done through one.
So if you’ve purchased your domain on GoDaddy and want to use Cloudflare to manage DNS you totally can. This is accomplished by modifying what’s called nameservers. Signup for Cloudflare and they’ll give you namerservers that you’ll modify on GoDaddy. Doing this tells “the internet” where to find your DNS.
I do recommend using Cloudflare as a domain registrar for one reason: they sell you domains at wholesale cost. The only downside is if you transfer an existing domain to Cloudflare, you have to repurchase it immediately even if you have another 6 months left on the registration with GoDaddy.
Summary: Choosing to stay with GoDaddy (or whoever else) only affects you financially.
2. Point your domain to your website server
The next thing your registrar/DNS does is tell the internet where your website is exists.
You see the internet works like your phone. You tap on a contact’s name and your phone dials a phone number. When go to a URL, you’re really going to an IP address. DNS is responsible for translating a domain name to an IP address (or location on the internet in the case of a CNAME record – semantics). It also does this for email addresses, FYI.
So there are two things to consider when choosing a DNS provider…
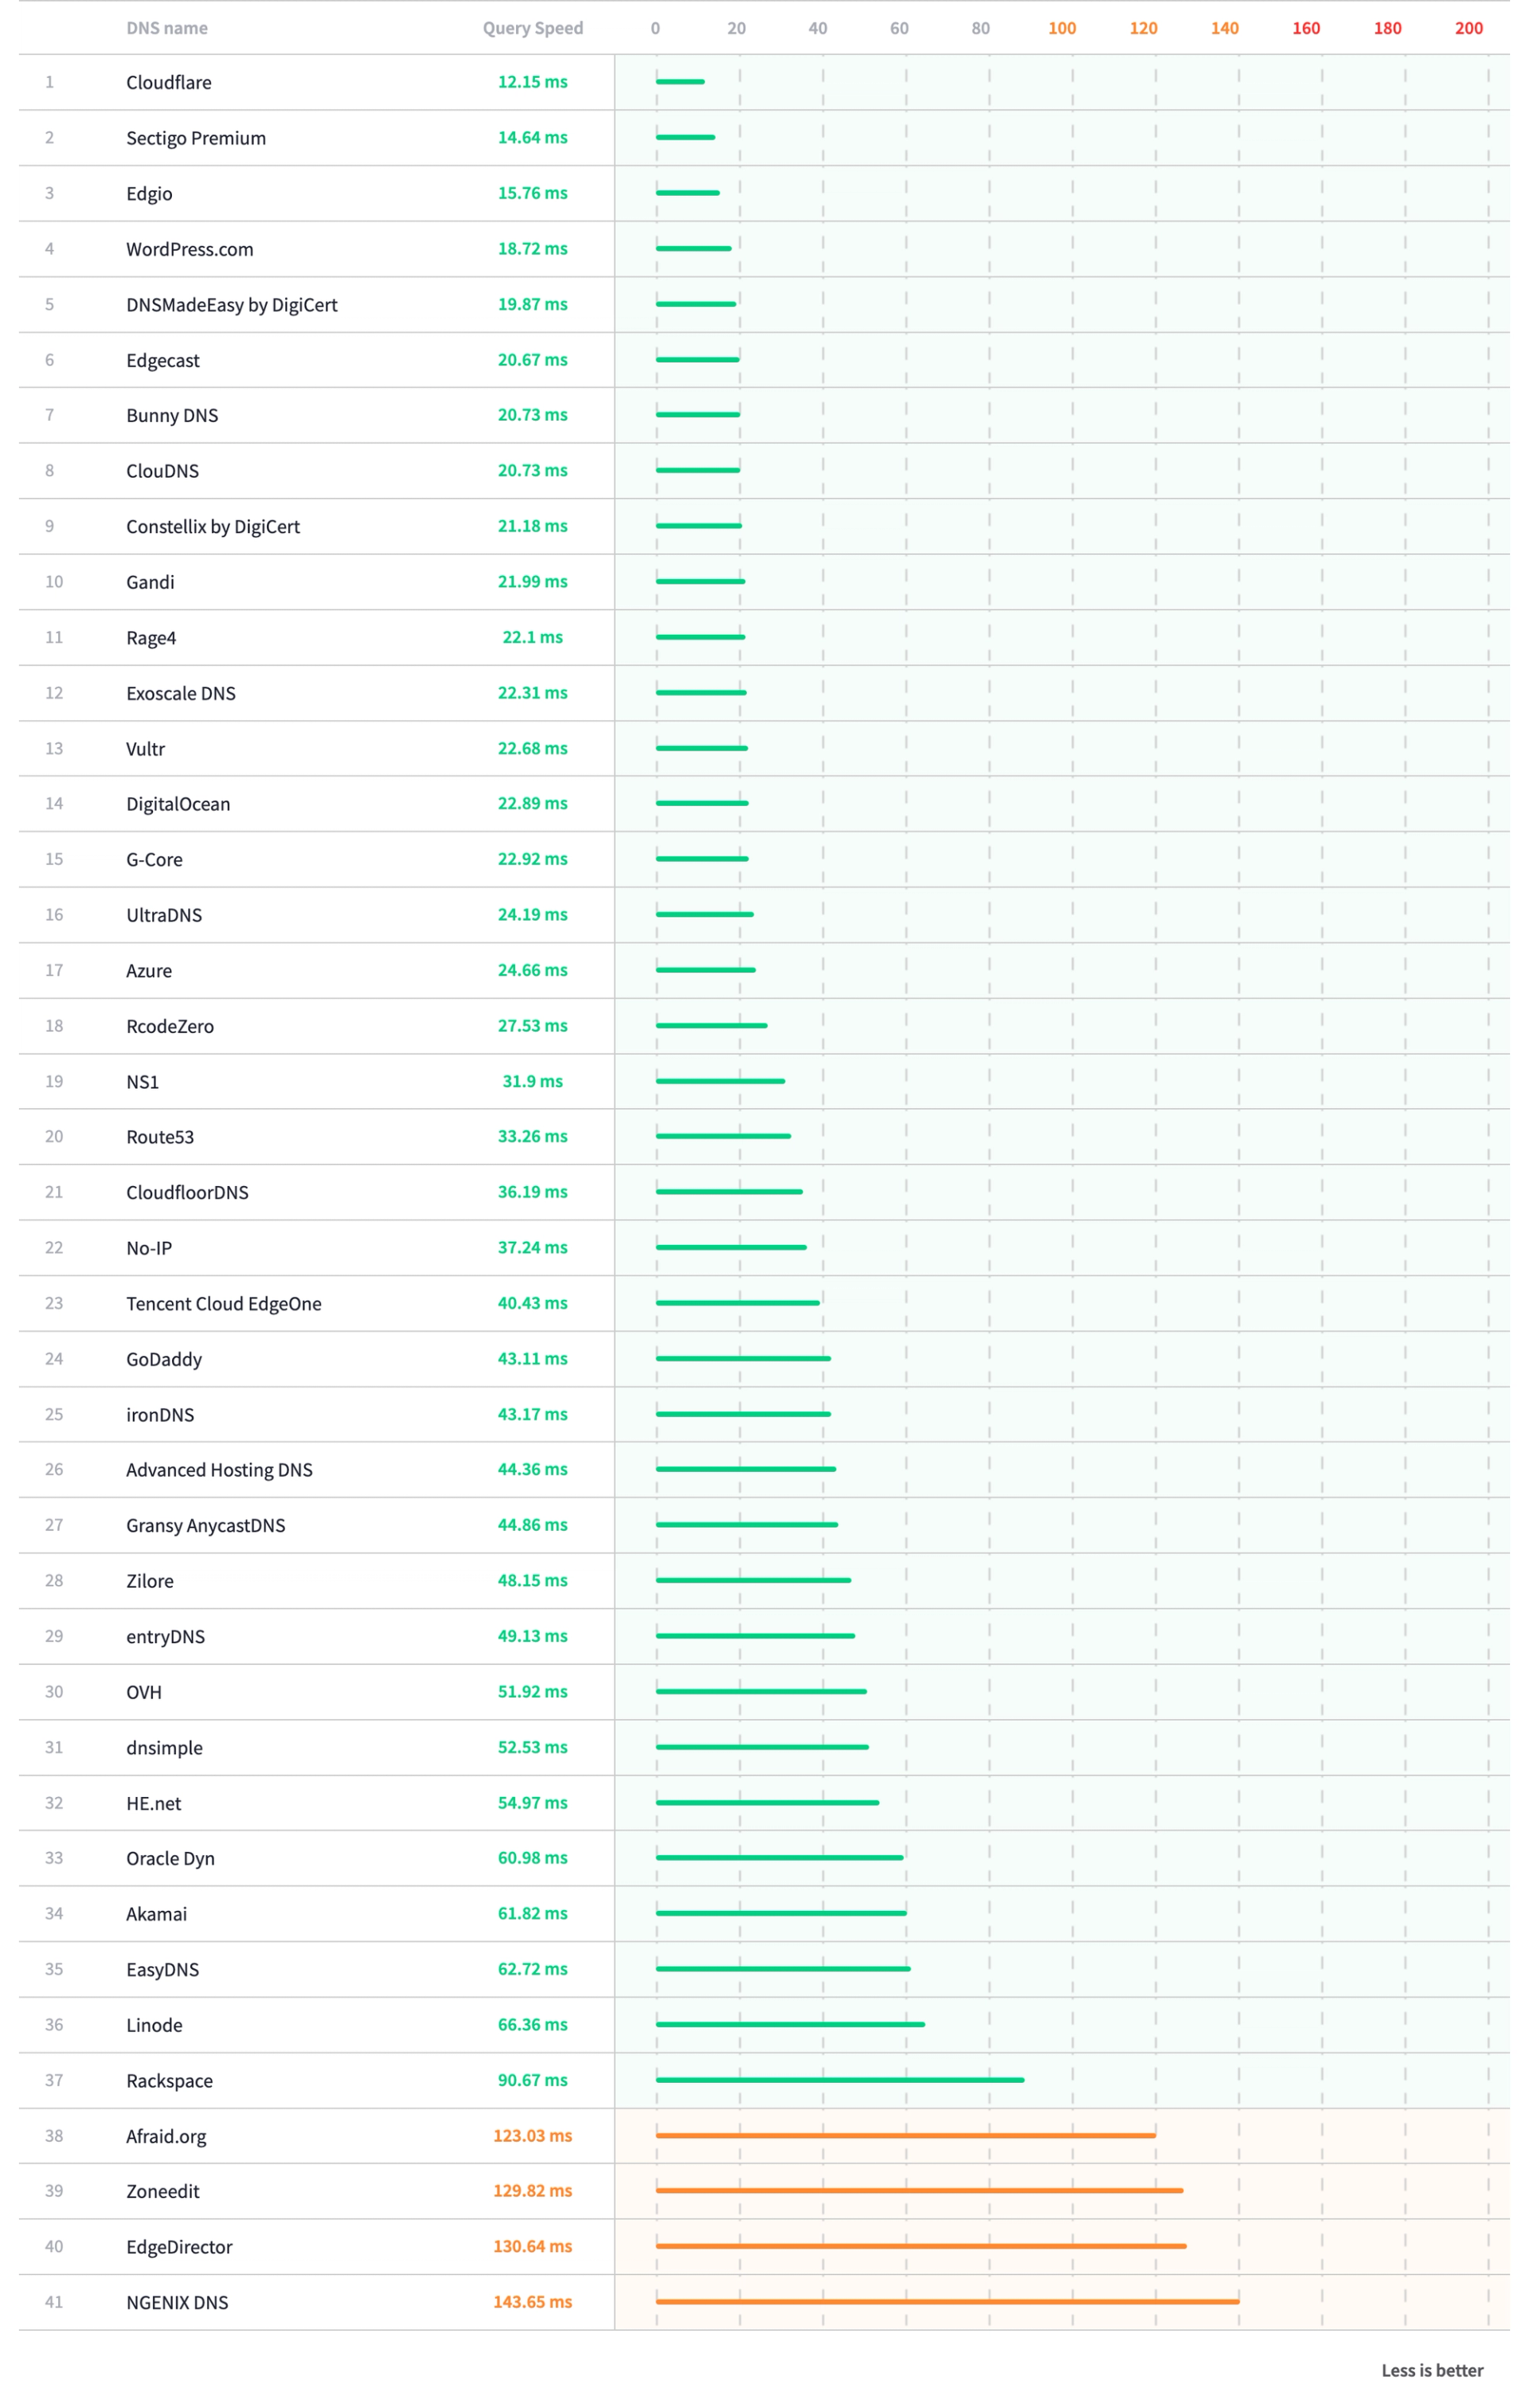
- How quickly it translates a domain name to an IP address
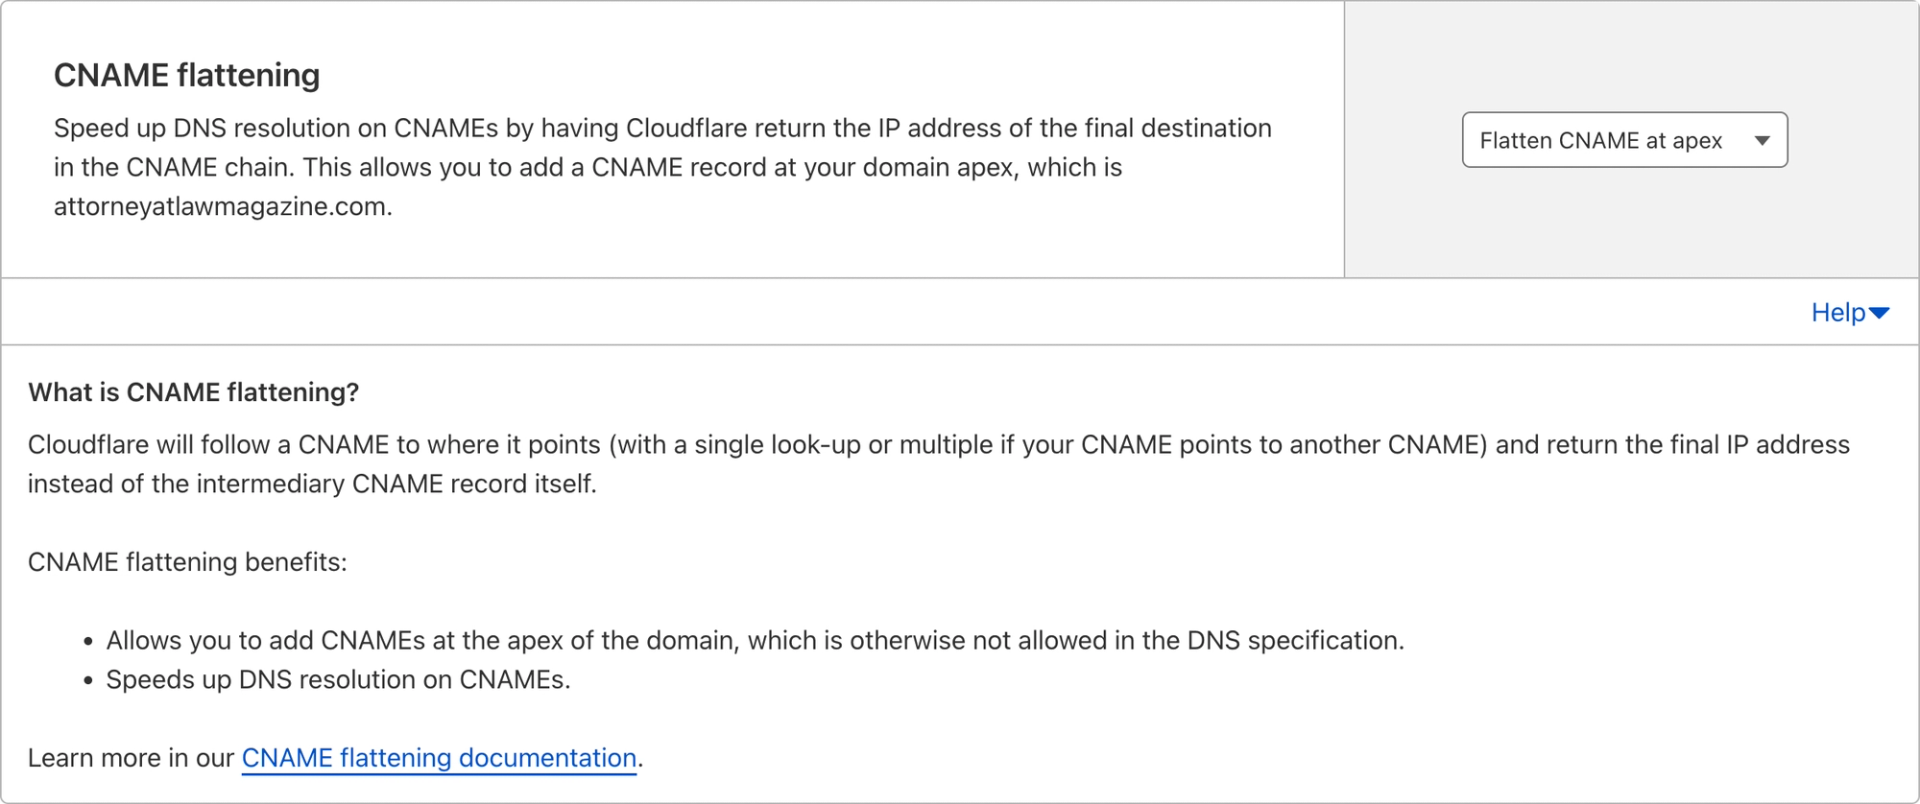
- Does it support features like CNAME flattening
Cloudflare is the fastest when it comes to DNS (verified by this third-party tool).
Secondly, Cloudflare is the most versatile DNS. Most website platforms, including Webstudio, require you to point a CNAME to their URL. Platforms like Hostinger don’t support this.
Summary: Move your DNS to Cloudflare to improve speed and features.
3. Do some really cool shit
The first two items so far were just child’s play.
This section is something only Cloudflare is doing.
Beyond being a simple DNS system that points visitors in the right direction, Cloudflare has a BUNCH of handy features that make your website faster, more secure, and more flexible.
You can take advantage of these free features (some are paid) by enabling the proxy when adding a DNS record.
The proxy means that when somebody goes to your site, Cloudflare will do the basic DNS stuff, and also optionally do other stuff like…
- Compress your CSS, JS, and HTML so your site loads faster
- Cache your website so that it loads insanely fast and doesn’t count towards your server usage if you have one
- Blocks malicious traffic trying to exploit some exploitable stuff
- Redirect URLs (in bulk too)
- Modify a request or response
- Protect your email so that malicious actors can’t send email on your behalf
All of that is FREE (and happens stupid fast).
Summary: Use Cloudflare to unlock a treasure trover of features that make your site faster, more secure, and more flexible.
Launching a Webstudio.is Site Using Cloudflare
This part of the guide will walk you through making your new Webstudio site live.
You have two options to launch: manual or automated.
I like choosing manual so I have full control and can add little notes (I’ll show you).
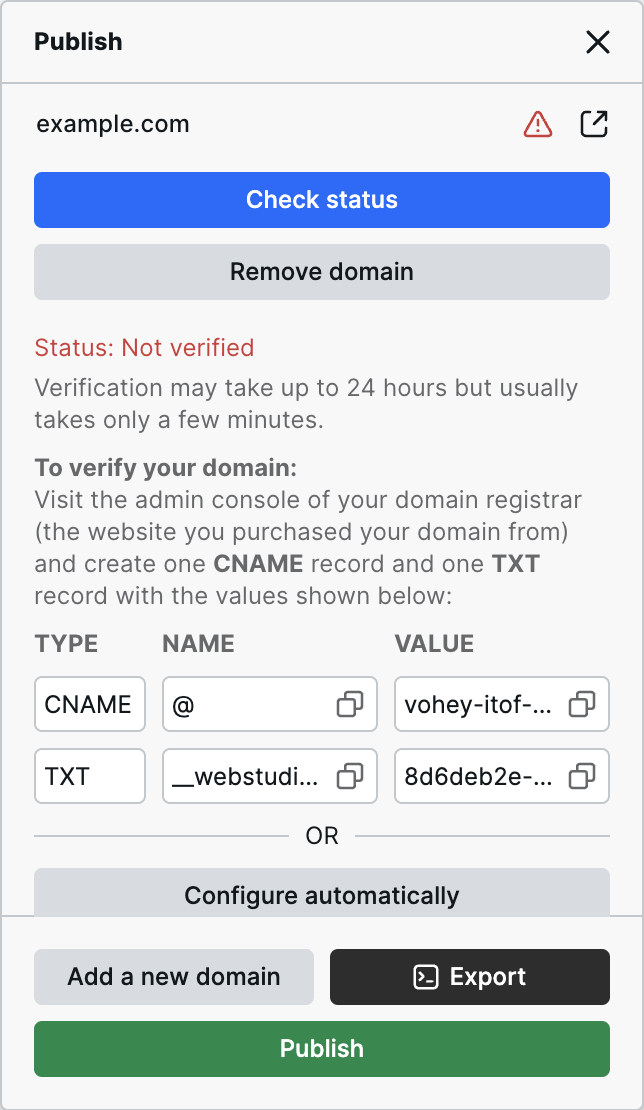
Regardless of the method, first click publish and add your domain. If you want to use “www” then add for example “www.example.com” otherwise use your root domain (my preference) such as “example.com”:
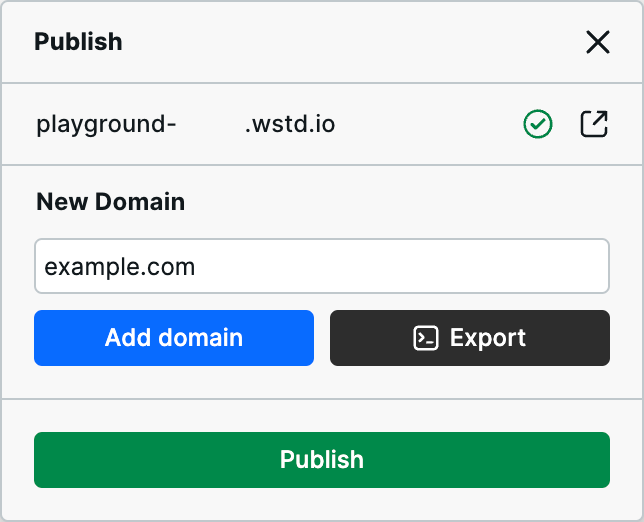
Then you’ll have the options to “configure automatically” or copy and paste the values manually.
Manual
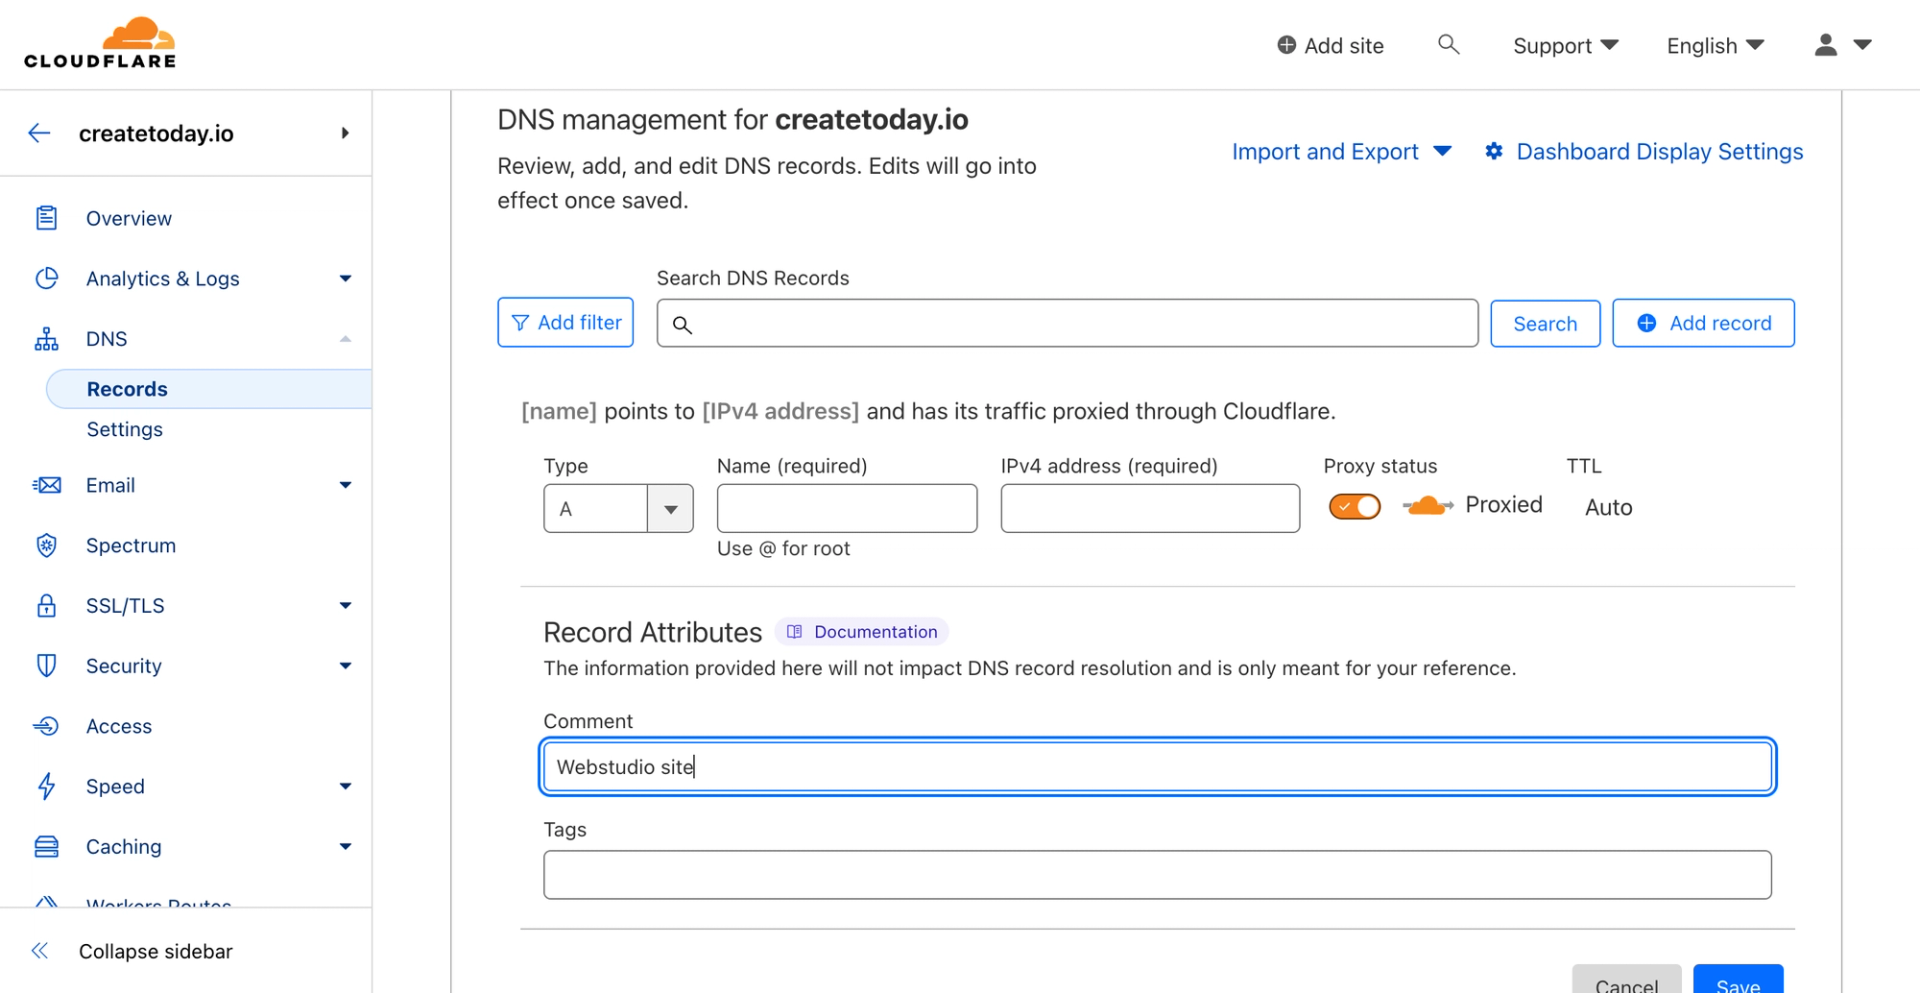
- Head over to Cloudflare > your domain > then DNS on the left side.
- Click “Add Record”
- Select “CNAME” in “Type” and paste into the name field whatever is in the publish dialog in Webstudio (usually “@” or your subdomain such as “www”). Also paste in the value. It’s good practice to enter a comment into the comment field for internal purposes (e.g., Webstudio site). That way in the future you know what every record in your DNS is doing. And if you no longer use the service, you can remove the record. And you can keep the proxy on!!
- Add new record, this time “Type” is “TXT” and enter the name and value.
- Click publish!
DNS supposedly can take 48 hours to launch… but in my 10 years of doing this it works in less than 15 minutes.
Automated
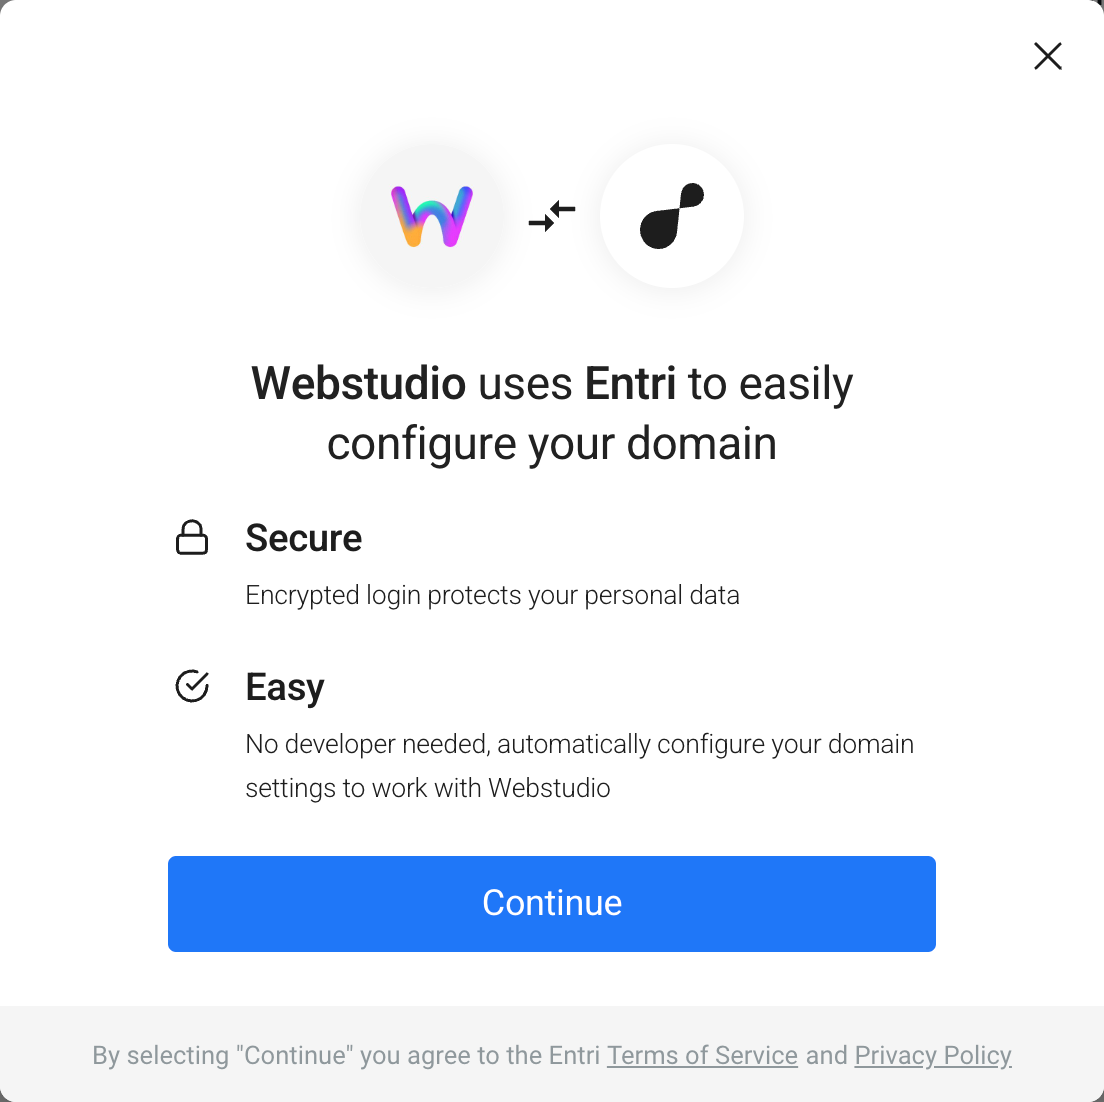
Webstudio integrates with Entri which automatically does the stuff from above (except add a comment).
While this is a great option, I haven’t used it before. So according to Webstudio, these are the steps:
- After you have added your root domain to the publish tab, click “Configure automatically with Entri”.
- Click “Continue” on the Entri configurator. This process will analyze your root domain and detect your DNS settings.
- Click on the Authorize button to redirect you to your DNS Provider site. Log in, if required, and approve the configuration.
- Return to Webstudio and complete the setup.
- Wait 10 minutes for the DNS change to apply. Then check if everything is setup correctly by clicking the “Check status” button inside the “Publish” tab.
Configuring Cloudflare for Webstudio
Unlike most other website platforms (such as Webflow, Duda, and Squarespace), you can actually turn the Cloudflare proxy on with Webstudio. (This fact made it on my top three reasons I switched from Webflow to Webstudio.)
With the proxy on, Cloudflare can do some cool shit like making your site way more secure, fast, and other stuff.
Let’s go over all the settings I recommend using.
Under Speed > Optimization, enable the following:
- HTTP/2 – The cool new way websites talk to your browser, making them faster and more efficient.
- HTTP/3 – The future of web communication, faster than a cheetah on roller skates.
- HTTP/2 to Origin – A secret handshake between your server and Cloudflare for super speedy connections.
- Enhanced HTTP/2 Prioritization – A fancy way of saying "we make sure your website loads smoothly and without hiccups".
- Brotli – Secret sauce to compressing data and serving it up faster than your desire to proxy Webflow traffic through Cloudflare.
- 0-RTT Connection Resumption – Think of it as a VIP pass that lets you reconnect to a website lightning fast.
- Always use HTTPS – Making sure your connection is secure and encrypted.
- TLS 1.3 – The Fort Knox of internet security, keeping your data safe and sound.
- Early Hints – Gives your browser a sneak peek of what's coming up, so it can start loading stuff in advance.
- Auto Minify (JavaScript, HTML, CSS) – Reduce the file size of source code on your website (I think Webflow already does this, but using Cloudflare's might do some additional stuff).Note: I'm keeping Mirage disabled for now. It caused a serious CLS issue on my website on my Webflow site, I haven’t tested with Webstudio yet).
Under Caching > Configuration, enable the following:
- Crawler Hints – They provide special clues to web crawlers, helping them understand and index your website more effectively.
Under SSL > Edge Certificates, enable the following:
- Always Use HTTPS – Ensuring your visitor data is always protected with encryption.
- Opportunistic Encryption – Take every chance to encrypt your data, even if it's not mandatory, for an extra layer of security.
- TLS 1.3 – The latest and greatest in secure communication protocols, keeping your online interactions safe and encrypted.
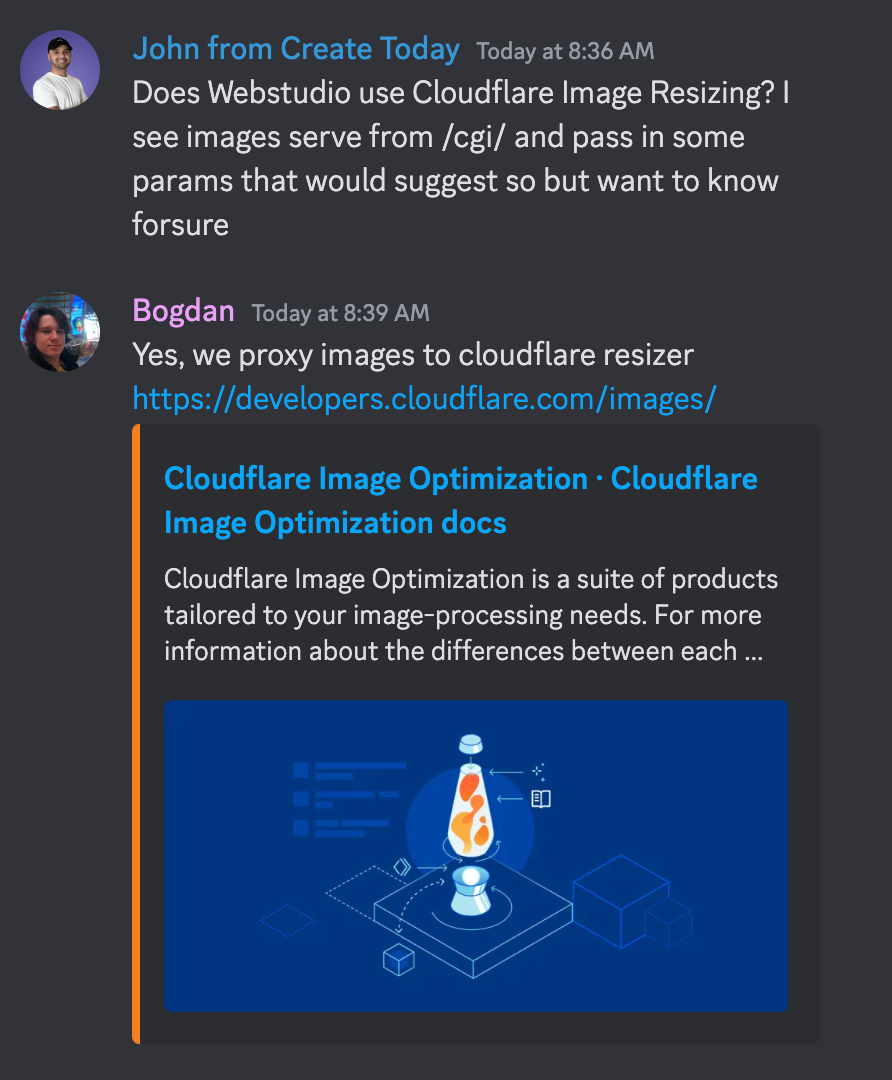
Note, you do not need to enable any of the Cloudflare resizing options as Webstudio automatically does this. They are compressed, resized, and converted to Webp format… as confirmed by one of the core Webstudio devs:
Those are all the settings I think most Webstudio sites should enable. There are other settings like Always Online™ that are optional.
The settings above should give you all the best performance, SEO, and security settings.
Enjoy the best website builder paired with the best DNS!
That’s a wrap on launching a Webstudio site with Cloudflare.
Excellent choice in both services.
Happy website creating!