Google Search Console Tutorial: From IDK to OMG
OMG! Google Search Console is the most valuable SEO tool. This Google Search Console Tutorial will take you from beginner to understanding that GSC is the tool to drive you results.
The ultimate epiphany and takeaway from this Google Search Console Tutorial will be, "Oh my gosh, this is the greatest tool for SEO!".
Not only can you get insights into super valuable data, but you can also take actions to affect your website's ranking.
This Google Search Console tutorial for beginners will quickly get you up to speed on what you need to know - from getting your GSC account setup to identifying complex issues. Even advanced users will learn something from this Google Search Console tutorial.
Here's what we'll cover:
- Getting Started
- Performance Insights
- Index
- Experience
- Links
- Settings
We're pretty much going in order of the GSC navigation.
The Importance of Google Search Console
If you're reading this, you know there is some value in learning GSC. But I want to emphasize the massive value there is in GSC.
There is no tool like it because the data comes from data that only Google has access to.
You see, GSC differs from Google Analytics (GA) in that you install GA on your website and report back to the software on website interactions. So, in essence, the data can be manipulated by you (or blocked by privacy extensions), and it only measures actions after they arrive at your website.
GSC, on the other hand, measures performance before arriving at your website.
Traffic from Google surpasses every other source on my website by a sizeable margin (e.g., Bing or Social). Therefore, the insights into this information are insanely valuable (and accurate).
Getting Started in GSC
Head over to Google Search Console. If you haven't added a "property" yet, you'll be presented with this screen:
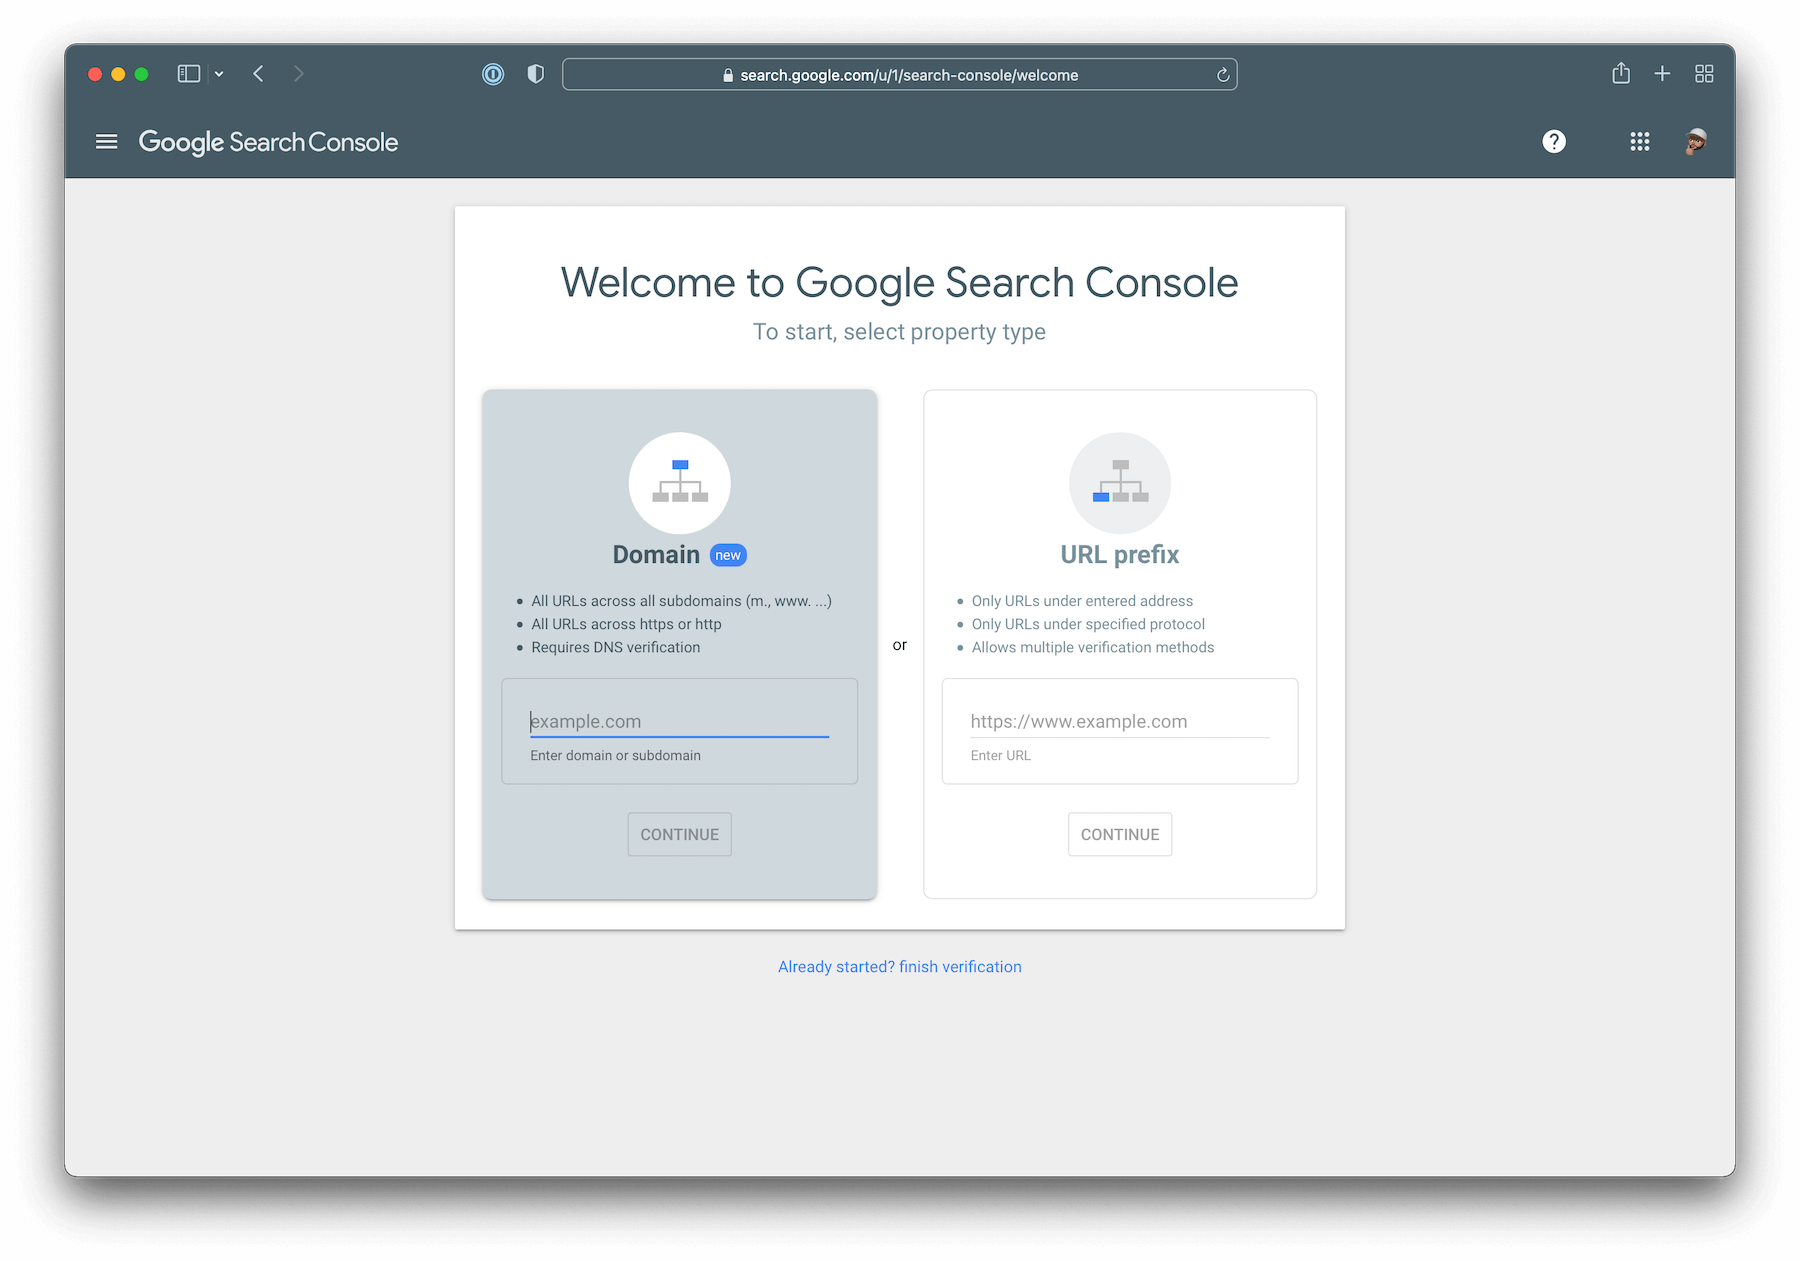
A property is essentially a website.
There are two types of properties you can add:
- Domain - will cover the domain and subdomains
- URL Prefix - will only cover the URL/domain entered
The Domain property type is the one you want. That way, you can see all activity across your entire property.
Enter your domain name like this: "example.com" - excluding "www" and "https".
Next, you'll be given instructions to verify ownership of your domain. Follow those instructions and copy the record it provides you into your DNS. Ownership is proved by adding a record to DNS, which only the domain owners have access to (you can't see insights into websites you don't own or that someone doesn't invite you to).
Once you add the record, click "Verify". If the screen turns green, you are good to proceed. If it turns red, that means that the record hasn't been "propagated" yet. Essentially when you add something to your DNS, it takes time for it to show up. Usually, it doesn't take more than 5 minutes, but I've seen it take up to 8 hours before (they say it can take up to 24 hours).
Now that you've verified your account, Google will typically not show any insights for a day or so. This is because the data isn't ready for your newly claimed account. Once the data is there, you won't have to wait anymore.
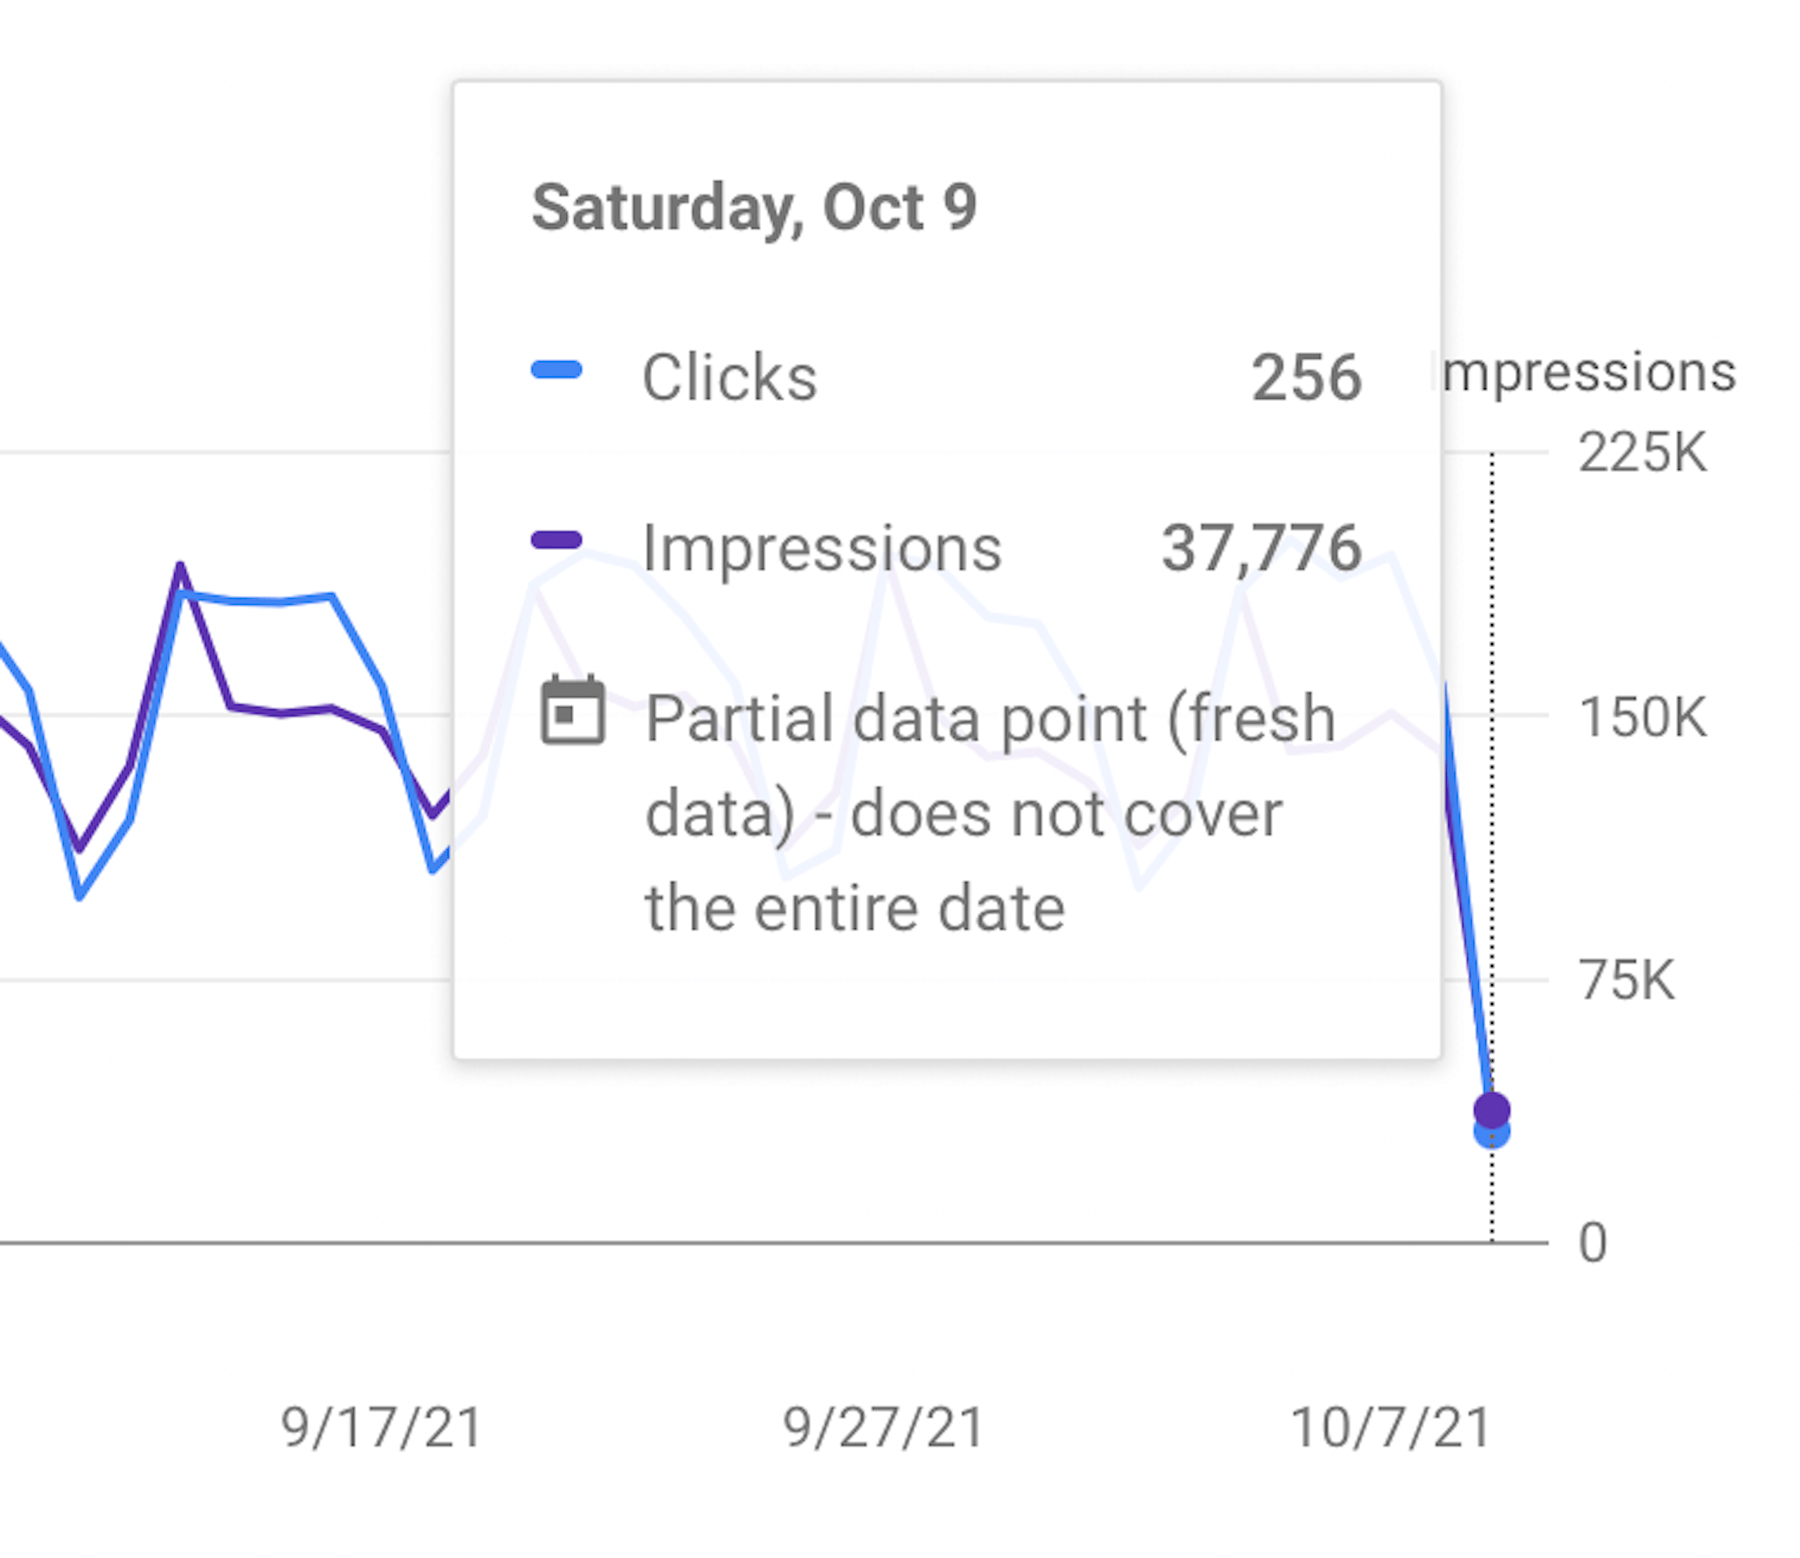
Data is typically 8 hours behind real-time. I'm always eager to check the latest day's data, but it'll say "partial data" and look like your traffic dropped. Wait another day to two days to get complete data.
Add a Sitemap
While you are waiting for data, let's add a sitemap! A sitemap is essentially an index of all the pages on your website and their last update times. This index helps inform Google of content changes on your website, causing them to crawl and index. A sitemap is not required for that to happen, but it helps.
Head over to Sitemaps on the left navigation and add your sitemap URL. Some platforms automatically generate one for you, and they are most commonly located at "sitemap.xml" (e.g., technicalmaster.io/sitemap.xml). Other platforms, such as WordPress, require you to add a plugin.
Once you add your sitemap, you are good to go. There are some cool technical insights we'll get into later.
But for now, let's look at the best insights of all: performance data.
Performance Insights
On the left nav, check out the Performance section. Most data will be in the "Search results", but for larger websites, you might have "Discover" and "Google News". If you only have "Performance", then your site is only in "Search results". Once you have the other sections, your dashboard will display them.
Quick summary of each one:
- Search Results (Performance) - performance insights into the typical Google search results, including web and videos.
- Discover - performance insights into Google's discover feature, which is available in the mobile Google app (it's a feed of recommended content).
- Google News - if you submit your website to Google News (and it's accepted), performance insights are displayed here.
Let's dive into the gold mine of data - Search results.
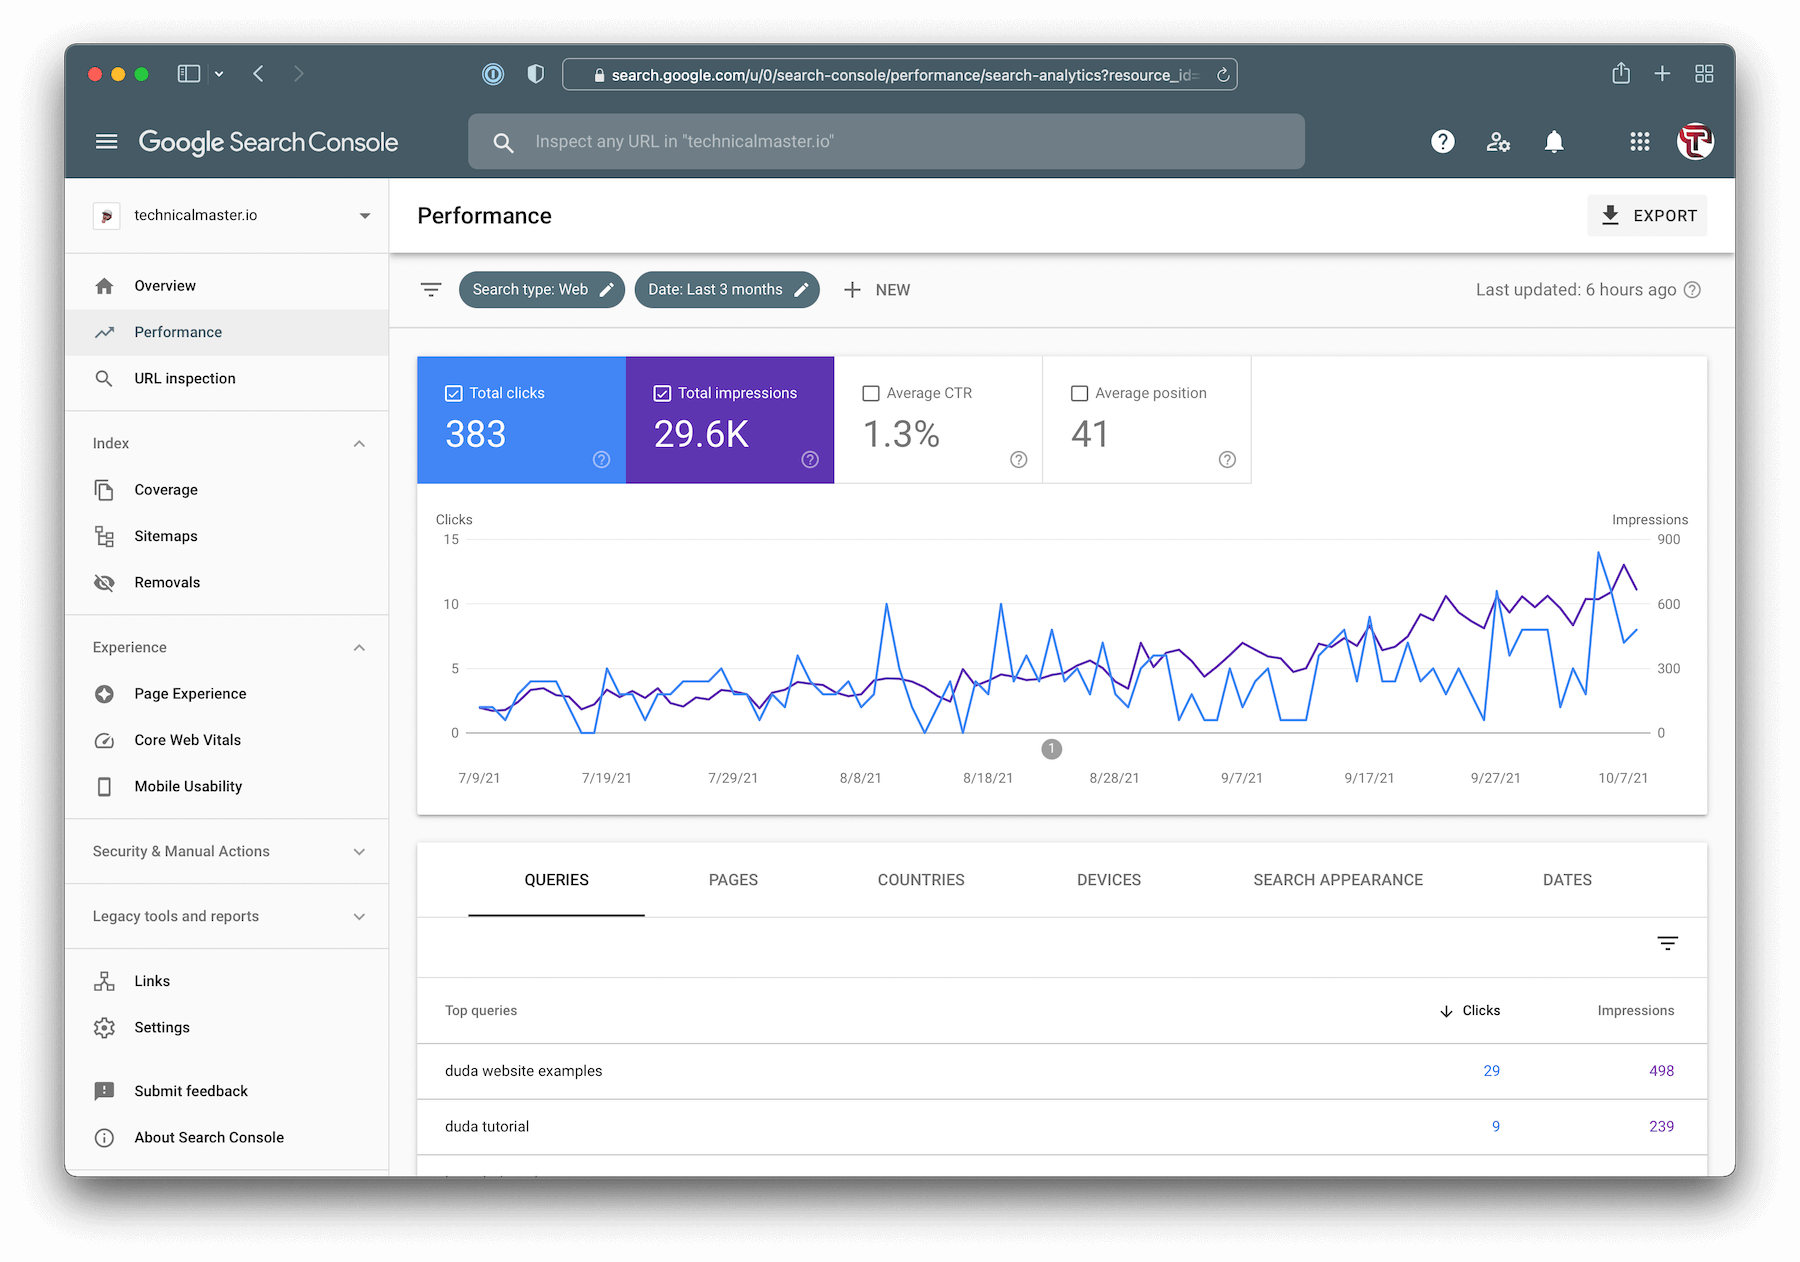
Right away, we are presented with a treasure trove of info. The chart at the top displays clicks, impressions, average CTR, and average position.
Quick summary of each one (as told by Google):
- Total clicks - "how many times a user clicked through to your site. How this is counted depends on the search result type".
- Total impressions - "how many times a user saw a link to your site in search results. This is calculated differently for images and other search result types, depending on whether or not the result was scrolled into view."
- Average CTR - "the percentage of impressions that resulted in a click."
- Average Position - "the average position of your site in search results, based on its highest position whenever it appeared in a search. Individual page position is available in the table below the chart. Position determination can be complicated by features such as carousels or Knowledge Panels."
The table below highlights the queries/search terms people use to find your website, the pages they are going to and more.
The queries information is the most valuable information of all. Google lets you know some of the queries people use to find your website. They don't show all, though. They seem only to show queries that are searched in volume, but one-off queries are usually not displayed.
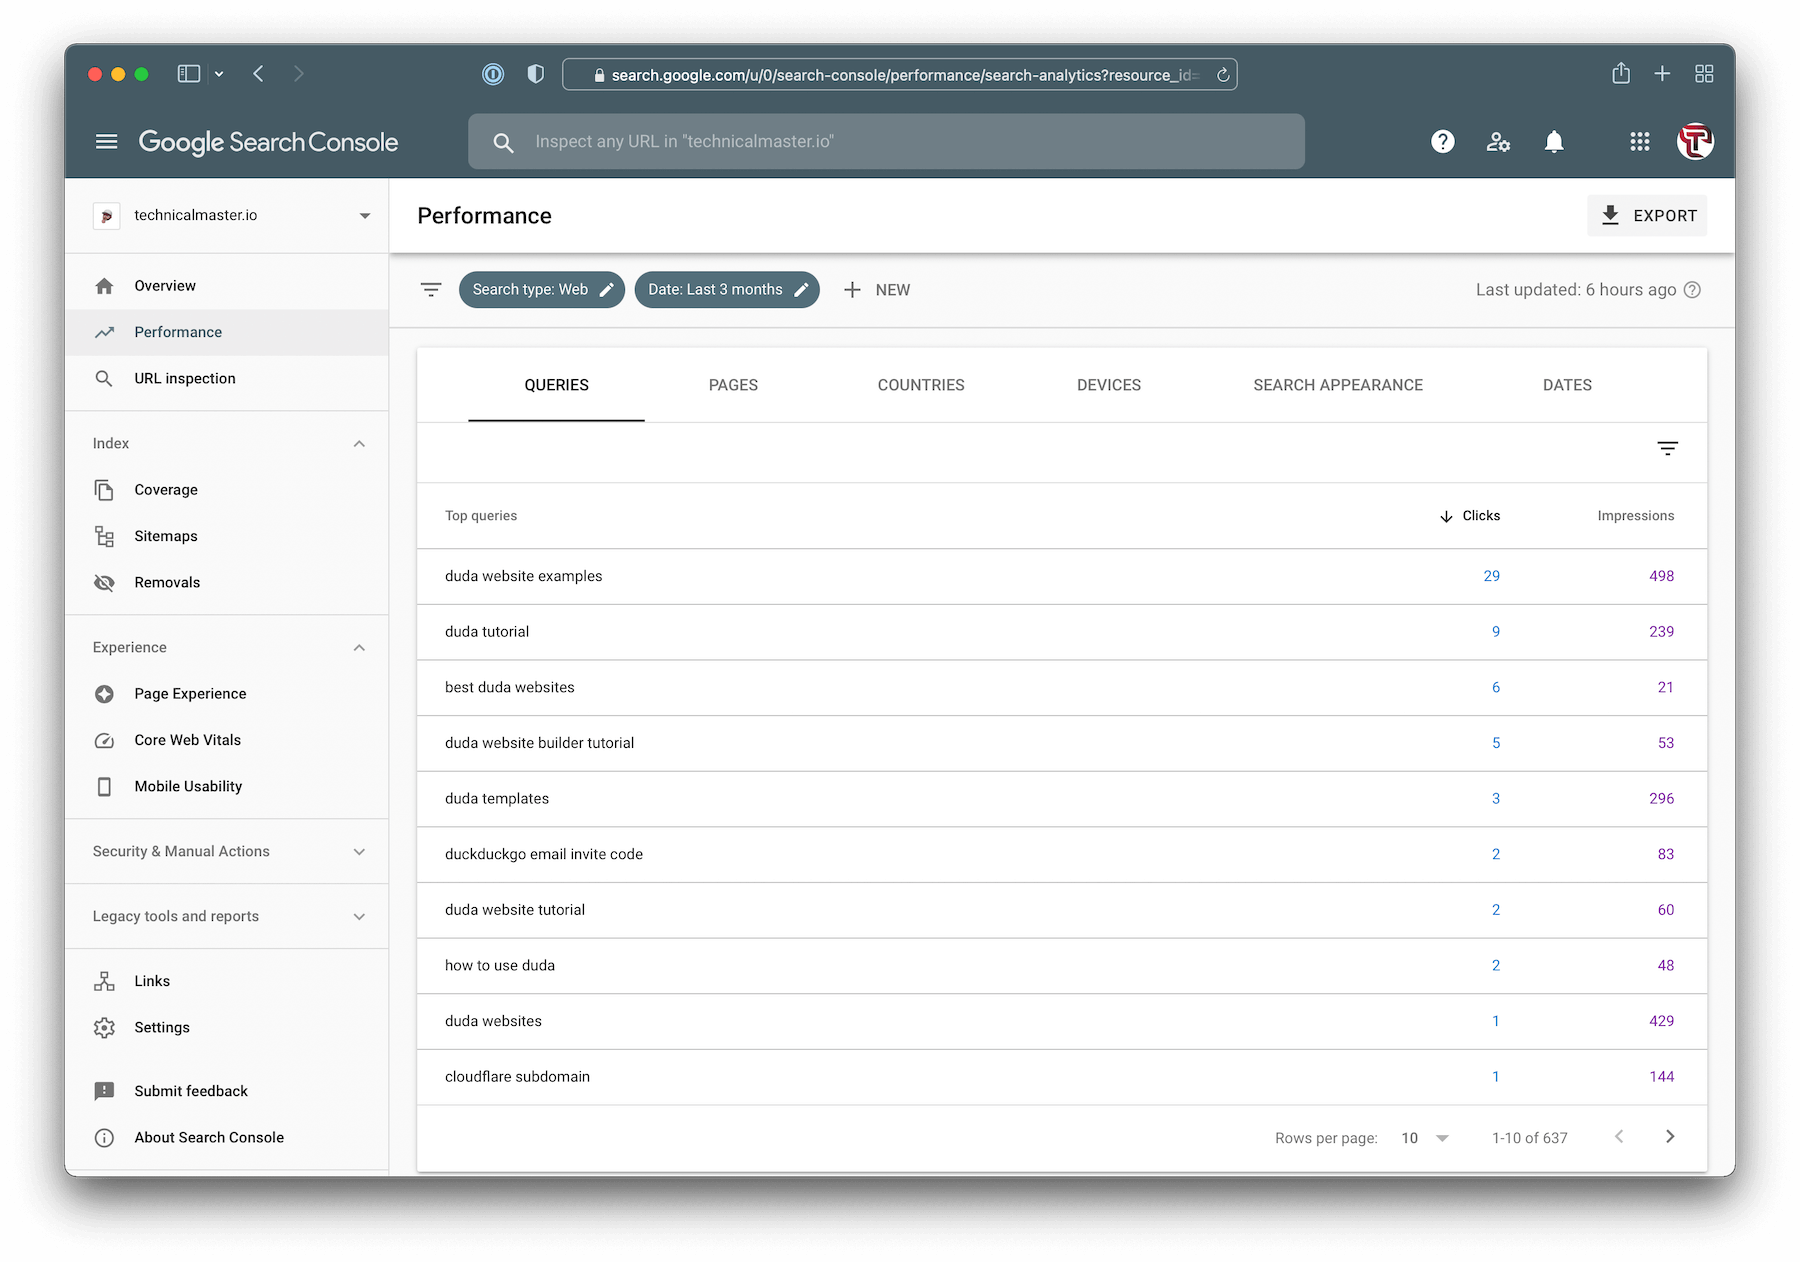
You can also see how many clicks and impressions each query gets. Remember, impressions are how much you are showing up in the search results, and clicks are how many times people actually click in.
These insights allow you to optimize your content with the terms people are actually searching for. I often go back to my content and add keywords as they show up in the queries table.
Because the queries information isn't complete, it's useful to jump over to the "Pages" tab to understand the total clicks and impressions each page gets.
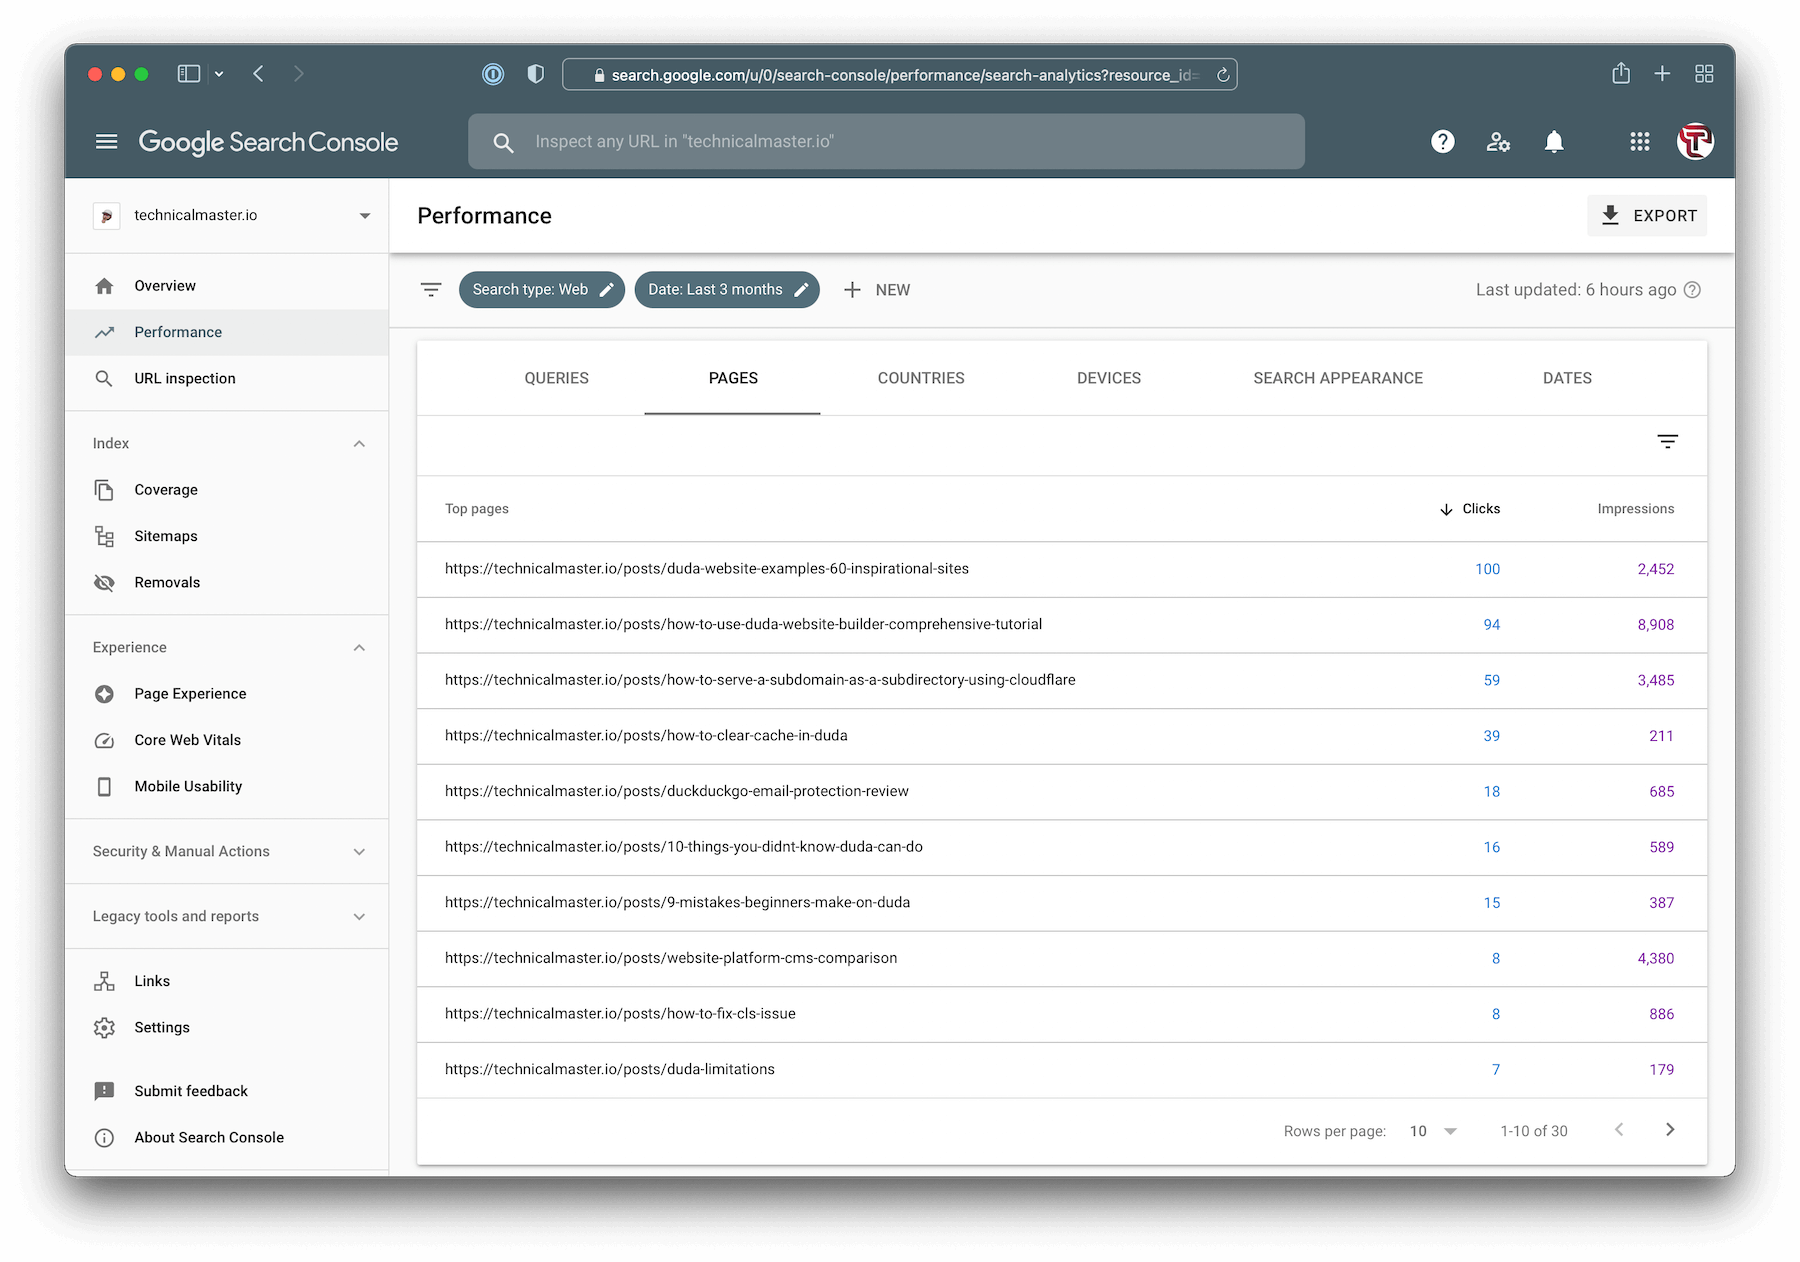
Note: You can click a page and head back over to the queries tab to see all the queries people use to get to that page. It's a great SEO habit to check these keywords and add them to your page.
When you are selecting pages or queries in the table, you are filtering by those. You can also apply filters at the top. These are super useful. Let's cover them.
The "Search Type" filter allows you to focus on traffic by the source of it. So for me, I post a lot of videos, and videos show up in the search results. So with this filter, I can see how much of my traffic comes from my videos. Search Type correlates to the tabs in Google where you can select All, Images, Videos, etc.
Search Appearance is different than Search Type in that the first focuses on content in the "All" tab. Videos sometimes display in the All tab, which is counted in Search Appearance.
The date filter lets you go back 16 months and view the most recent data too. But as mentioned before, recent data is not complete until a day or two after the date passes. You can also compare timeframes (e.g., last three months vs. previous three months).
Then you can click the "+ New" to add additional filters such as the query, page, country, device, and search appearance.
These filters can be combined to get granular!
Want to focus on mobile traffic to your homepage? Combine the device and page filter! Get creative.
Takeaways + more tips:
- Make sure your content naturally includes the queries
- Not all queries are shown to us (I assume for privacy and storage concerns)
- The average position is not useful unless you focus on a single query
- You can click the boxes at the top of the chart to turn them on and off. Doing this will impact the chart and the table below.
Index
Next up in this Google Search Console tutorial is the Index! Google's Index is a record of all your web pages (and other websites). To get in the Index, Google bots first crawl the page to understand the content. You can learn more on Google's site.
So the index section gives you information about the pages Google knows about, whether or not they are in the Index, and if there are any issues.
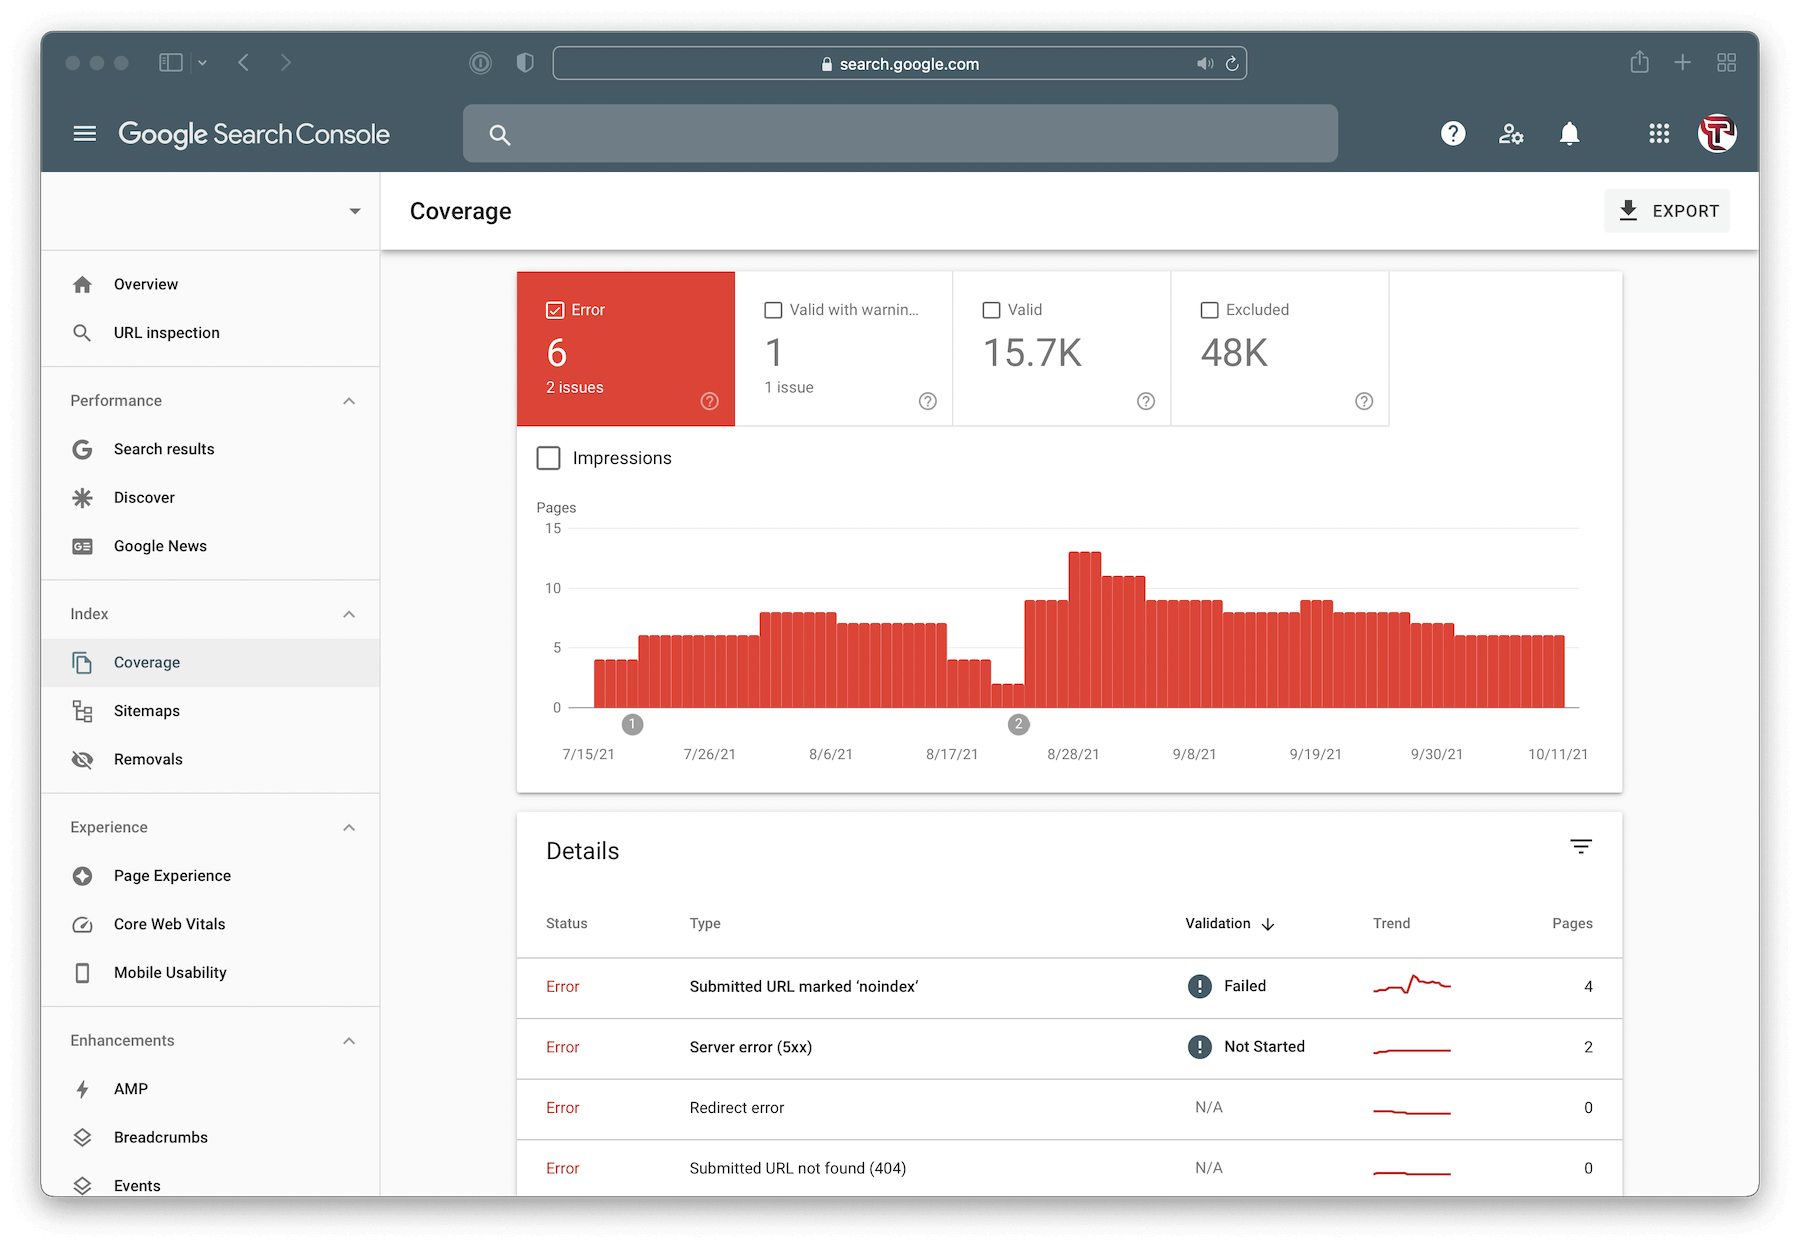
Head over to the Coverage tab to get insights. You can turn on and off the various statuses by clicking the boxes above the chart.
Your pages will fall into one of four categories:
- Error - Pages that aren't indexed for some reason
- Valid with warnings - Pages that are indexed but have some known issues (may or may not be a problem)
- Valid - Indexed pages! Right where you want to be (unless you intentionally no-index a page)
- Excluded - Known pages that are not indexed likely for intentional purposes (maybe it's an old link that redirects to a new page)
How to Identify and Fix index Errors
When clicking each of the boxes at the top of the chart, the table below responds. So if you have an error, check the table below.
You can click each error to understand which pages are affected. Once you fix the error, click "Validate Fix", and Google's bots will analyze those pages to verify if it was fixed.
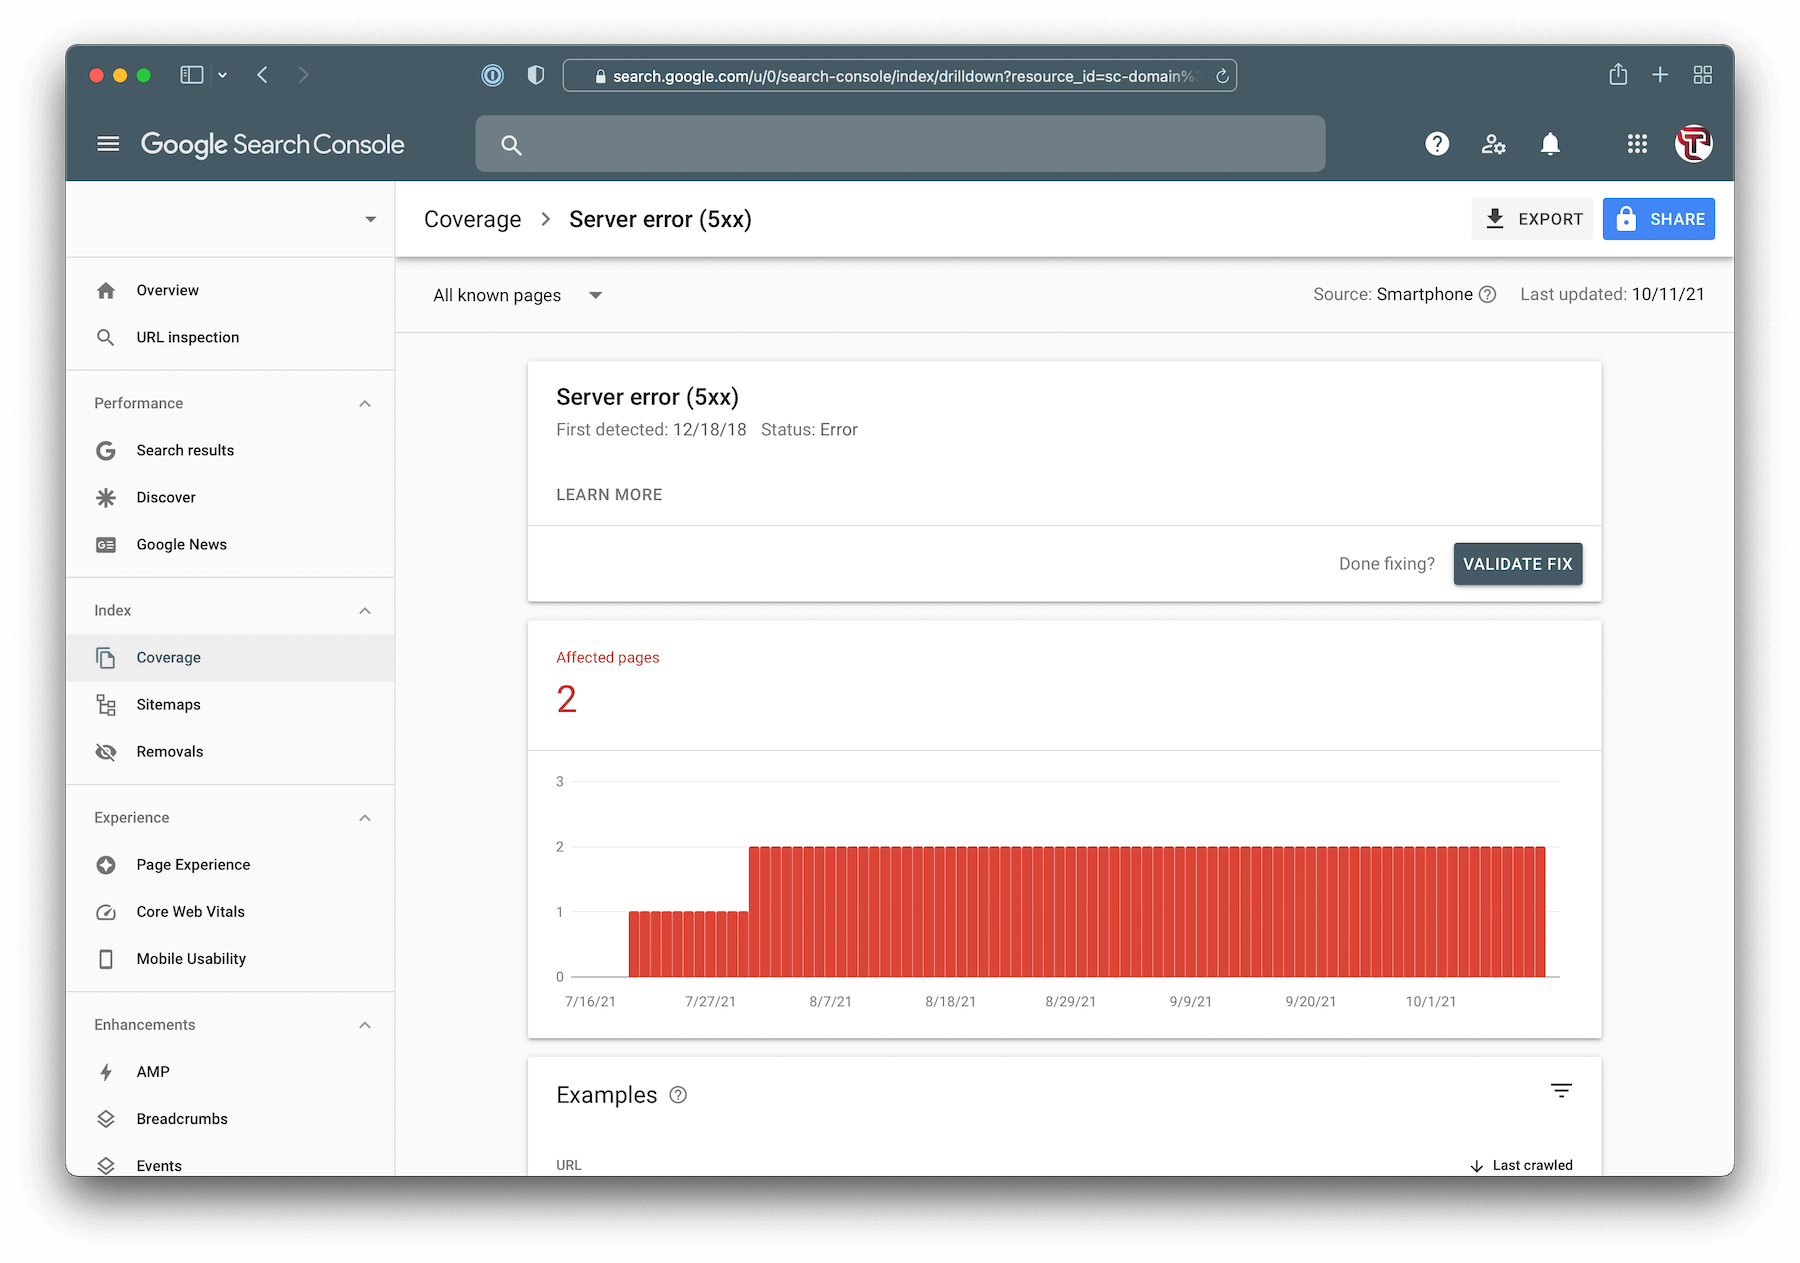
It takes time. Their bots seem to work as fast as the pages are crawled. So if it's an old page that doesn't change much, it'll likely take longer for the validation.
Experience
In mid-2021, Google introduced Experience into its ranking algorithm. Now, pages with good Experience are given a boost in rankings.
You can learn more about these exact vitals here.
Ultimately, Google wants to make sure the page loads fast (LCP), that there is little delay when you interact with the page (FID), and how much the page shifts around (CLS).
Google scores each of these categories into three tiers: Good, Need Improvement, and Poor.
They measure these "Core Web Vitals" by using real user data collected from Chrome.
Because it takes real user data, only sites with high volume have these metrics available (although you can run one-off tests on PageSpeed Insights).
On the left nav in GSC, go to Experience, and you'll see something like this:
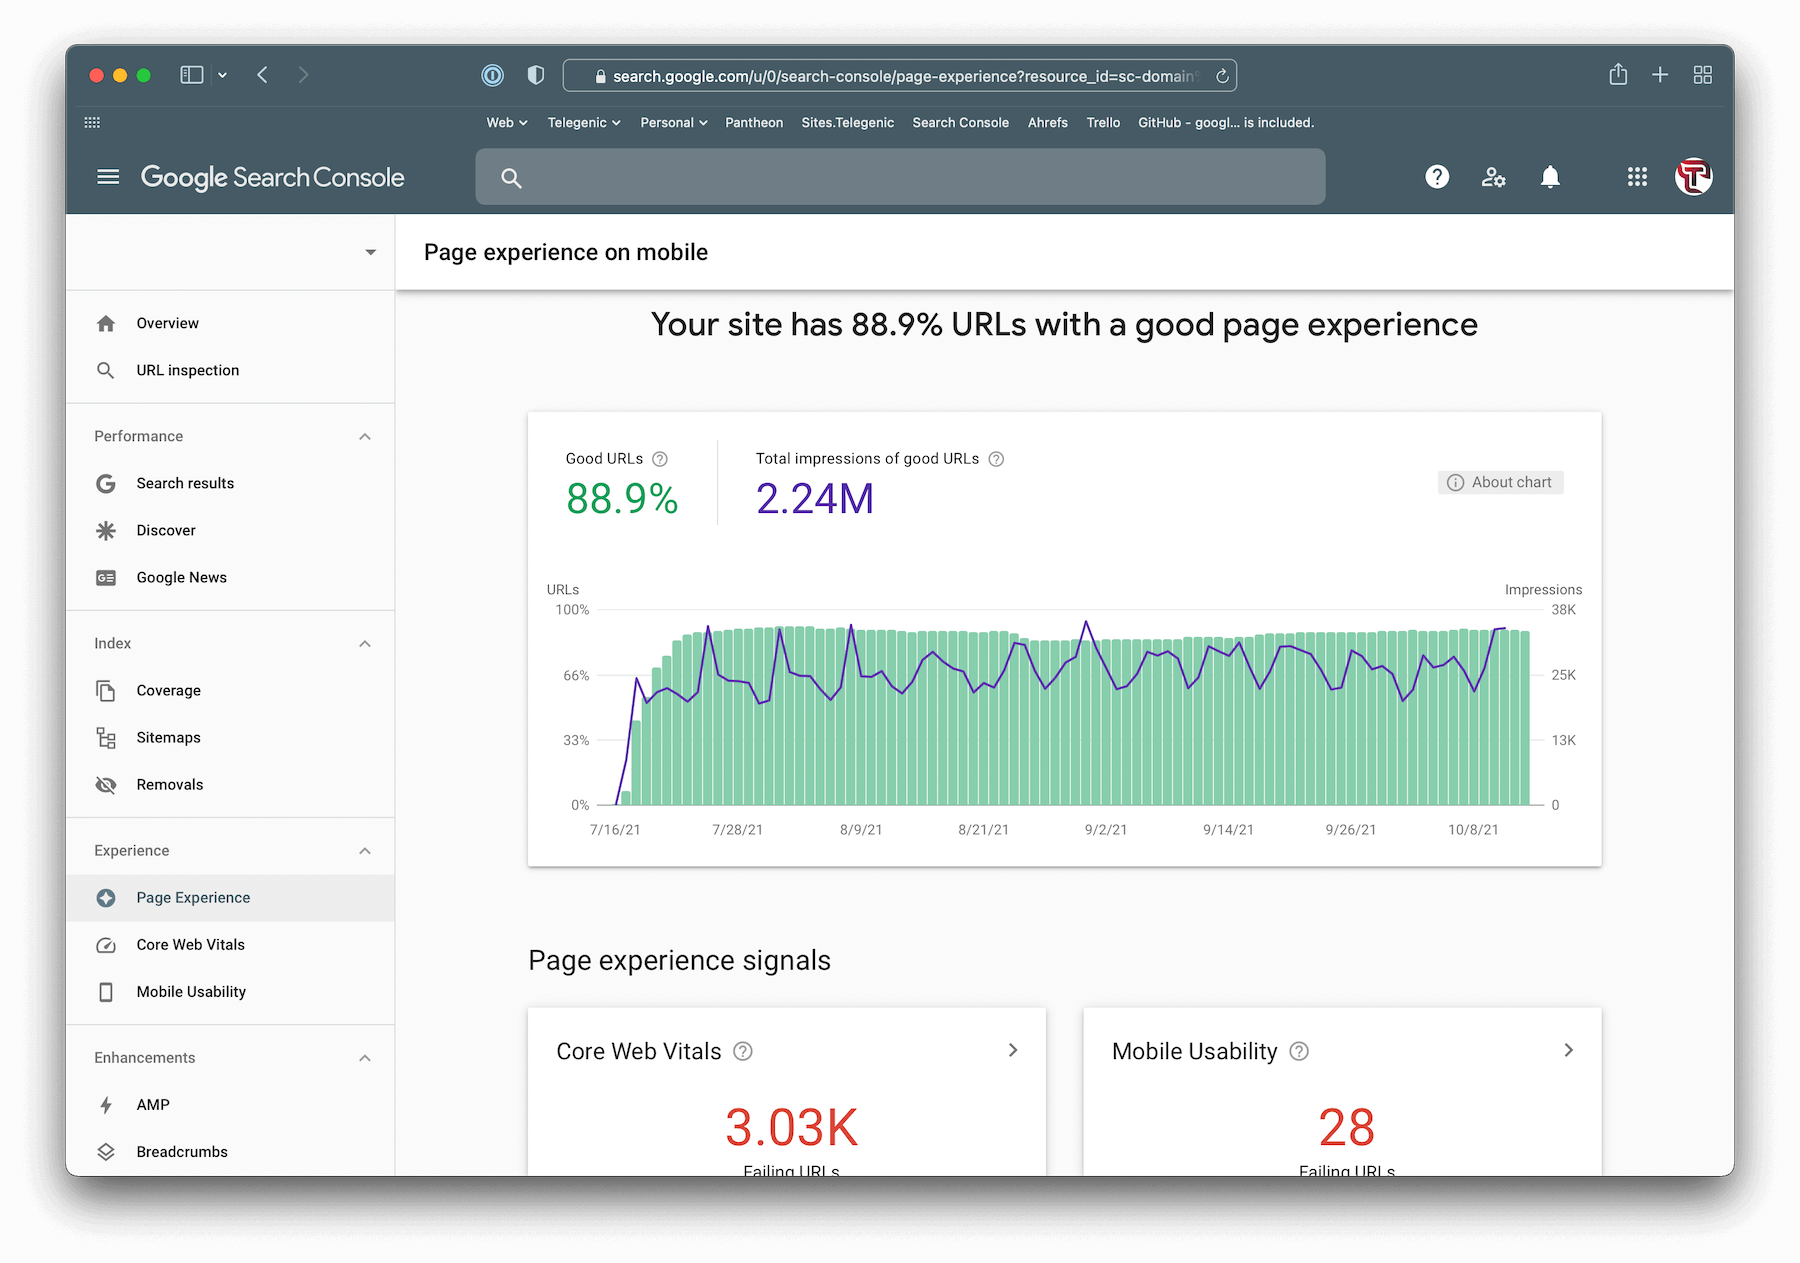
Next up, go to Core Web Vitals, which will break down your vitals in mobile and desktop, and you can furthermore see each individual vital for each device.
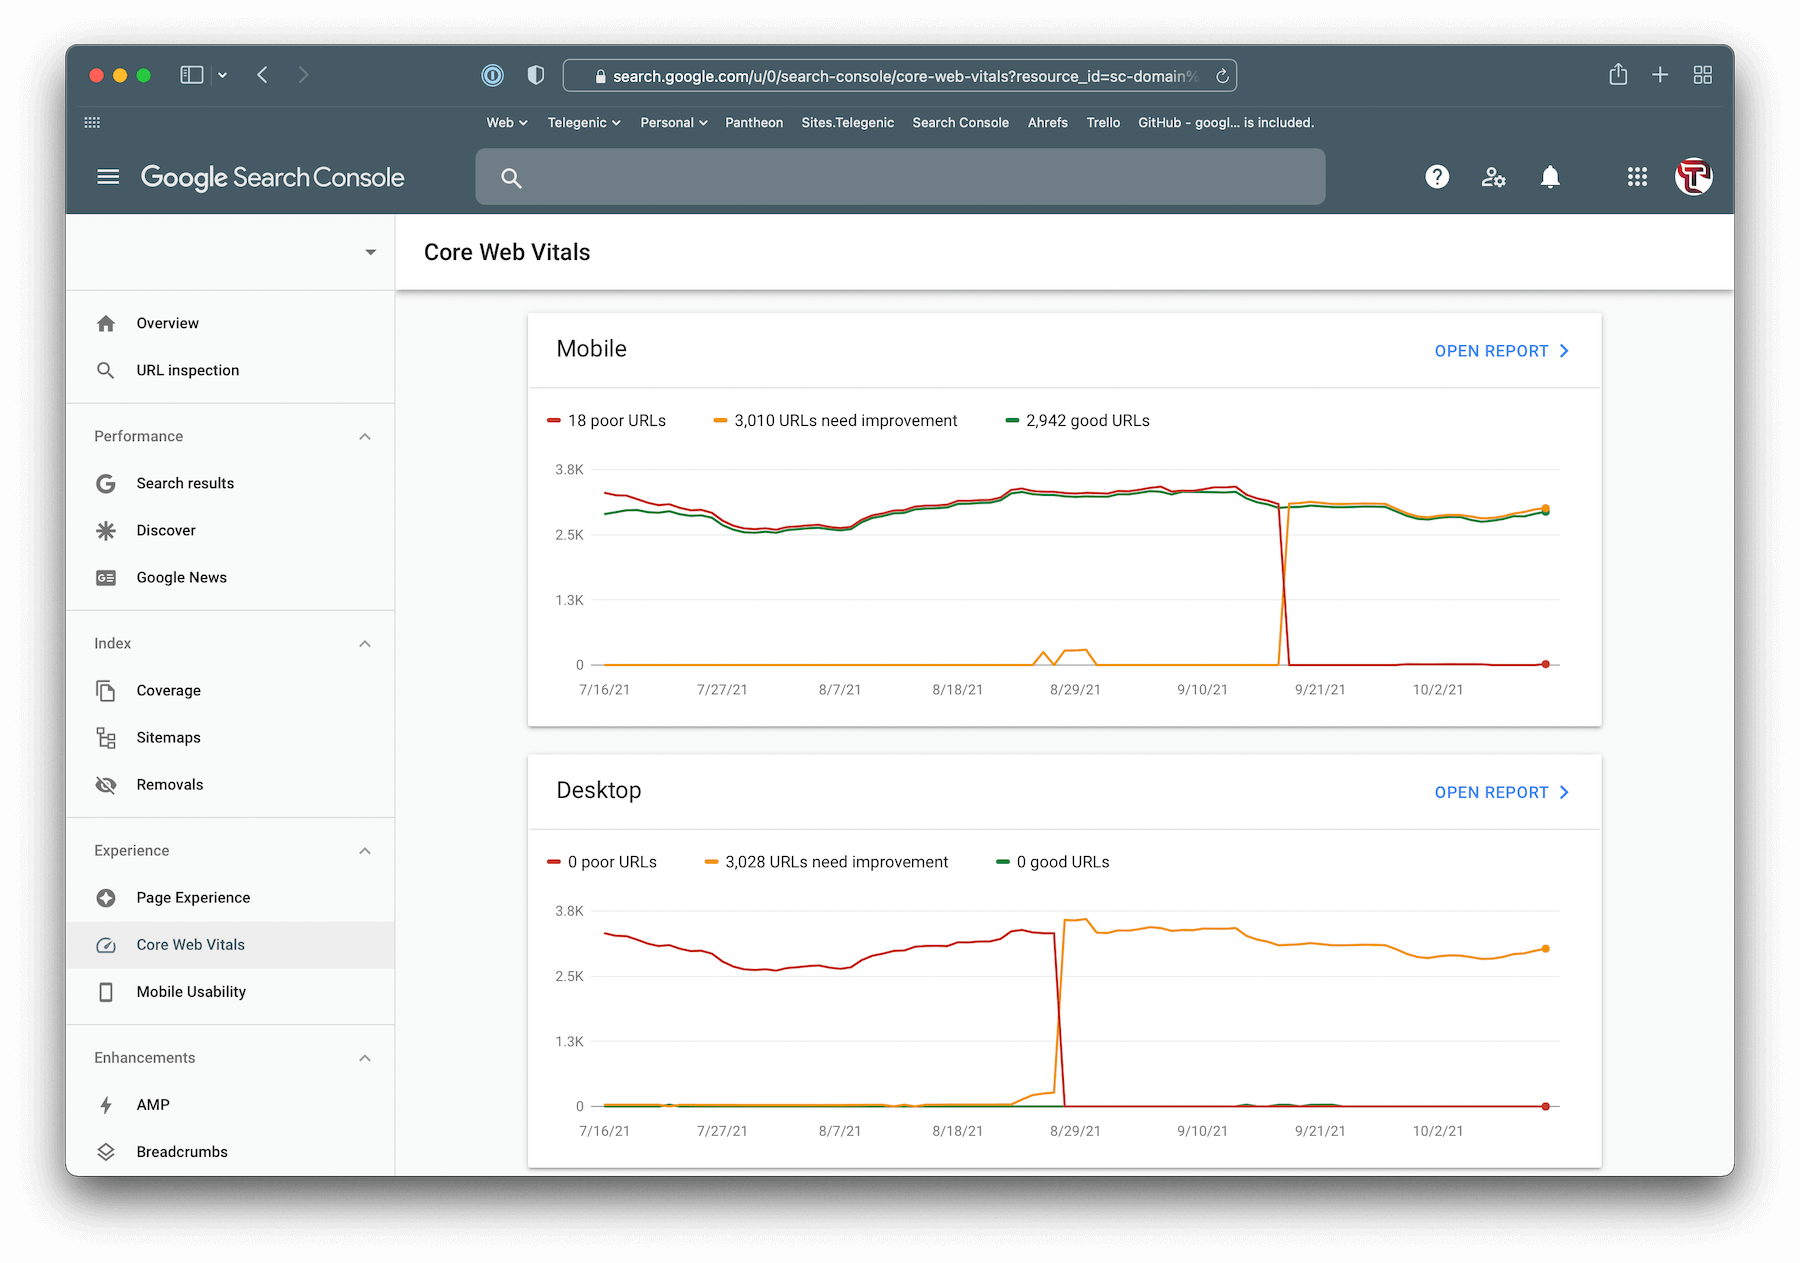
Once you click "Open Report", you'll see this (if you have enough volume to report these metrics):
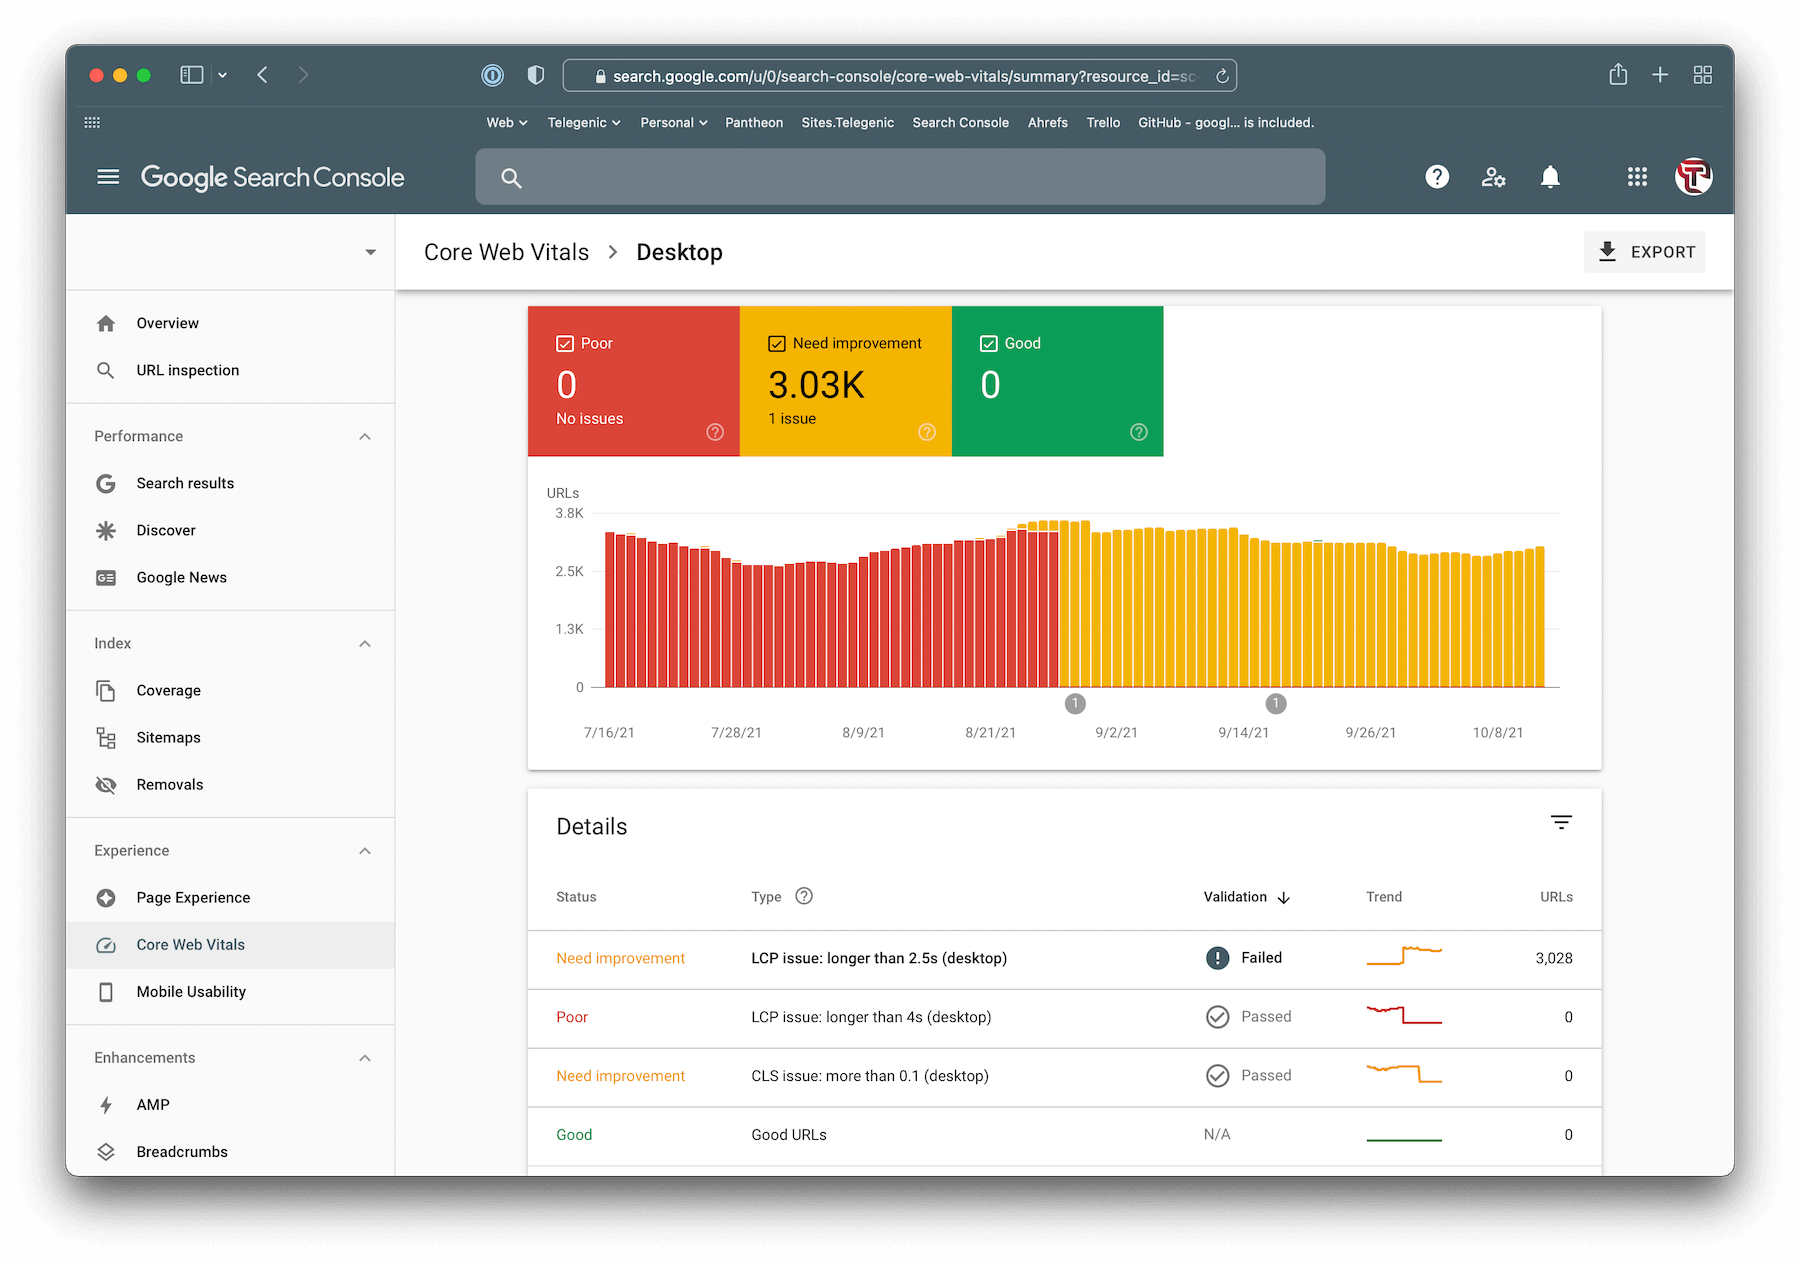
This data is very handy! These are the insights that Google algorithms take into account when ranking your website.
Identify issues, fix them, and validate the fix by opening the issue and clicking validate fix.
I covered an article on how to fix CLS issues in depth. It's one of the easiest vitals to fix.
Links
The classic SEO ranking factor: links.
You can talk all day about how you're the best at what you do, but for any subject that is competitive, you're going to need other websites linking to you to prove your credibility. The more credible the website, the better your rankings.
Note: Links should not be purchased (nor other types of agreements). That's a violation of Google's policy (you'll know if you get caught if you receive a "Manual Action", which shows up in GSC under "Security & Manual Actions").
Not all links are treated equally. Links from highly credible websites boost your website more. Beyond that, if the linking website's anchor text is a keyword you want to rank for, then that will help you out a bunch.
For example, if you are a web design company, it's very beneficial for another website to link to you with the link text being "web design company in Arizona".
So, Google gives you information of links they've found pointing to your website and the anchor text used.
Head over to the left nav and click "Links".
Beyond external links, they also show you how many times your own website links to each page. Pages with many internal links that point to it are likely more important and have a better chance of ranking.
Settings
Under settings, you can add and remove users, inform Google of a URL change, view crawl stats, and more.
How to Add and Remove a User from Google Search Console
Go to Settings, then Users and Permissions, and click Add User in the top right. To remove a user, click the three dots next to the user and click "Remove Access".
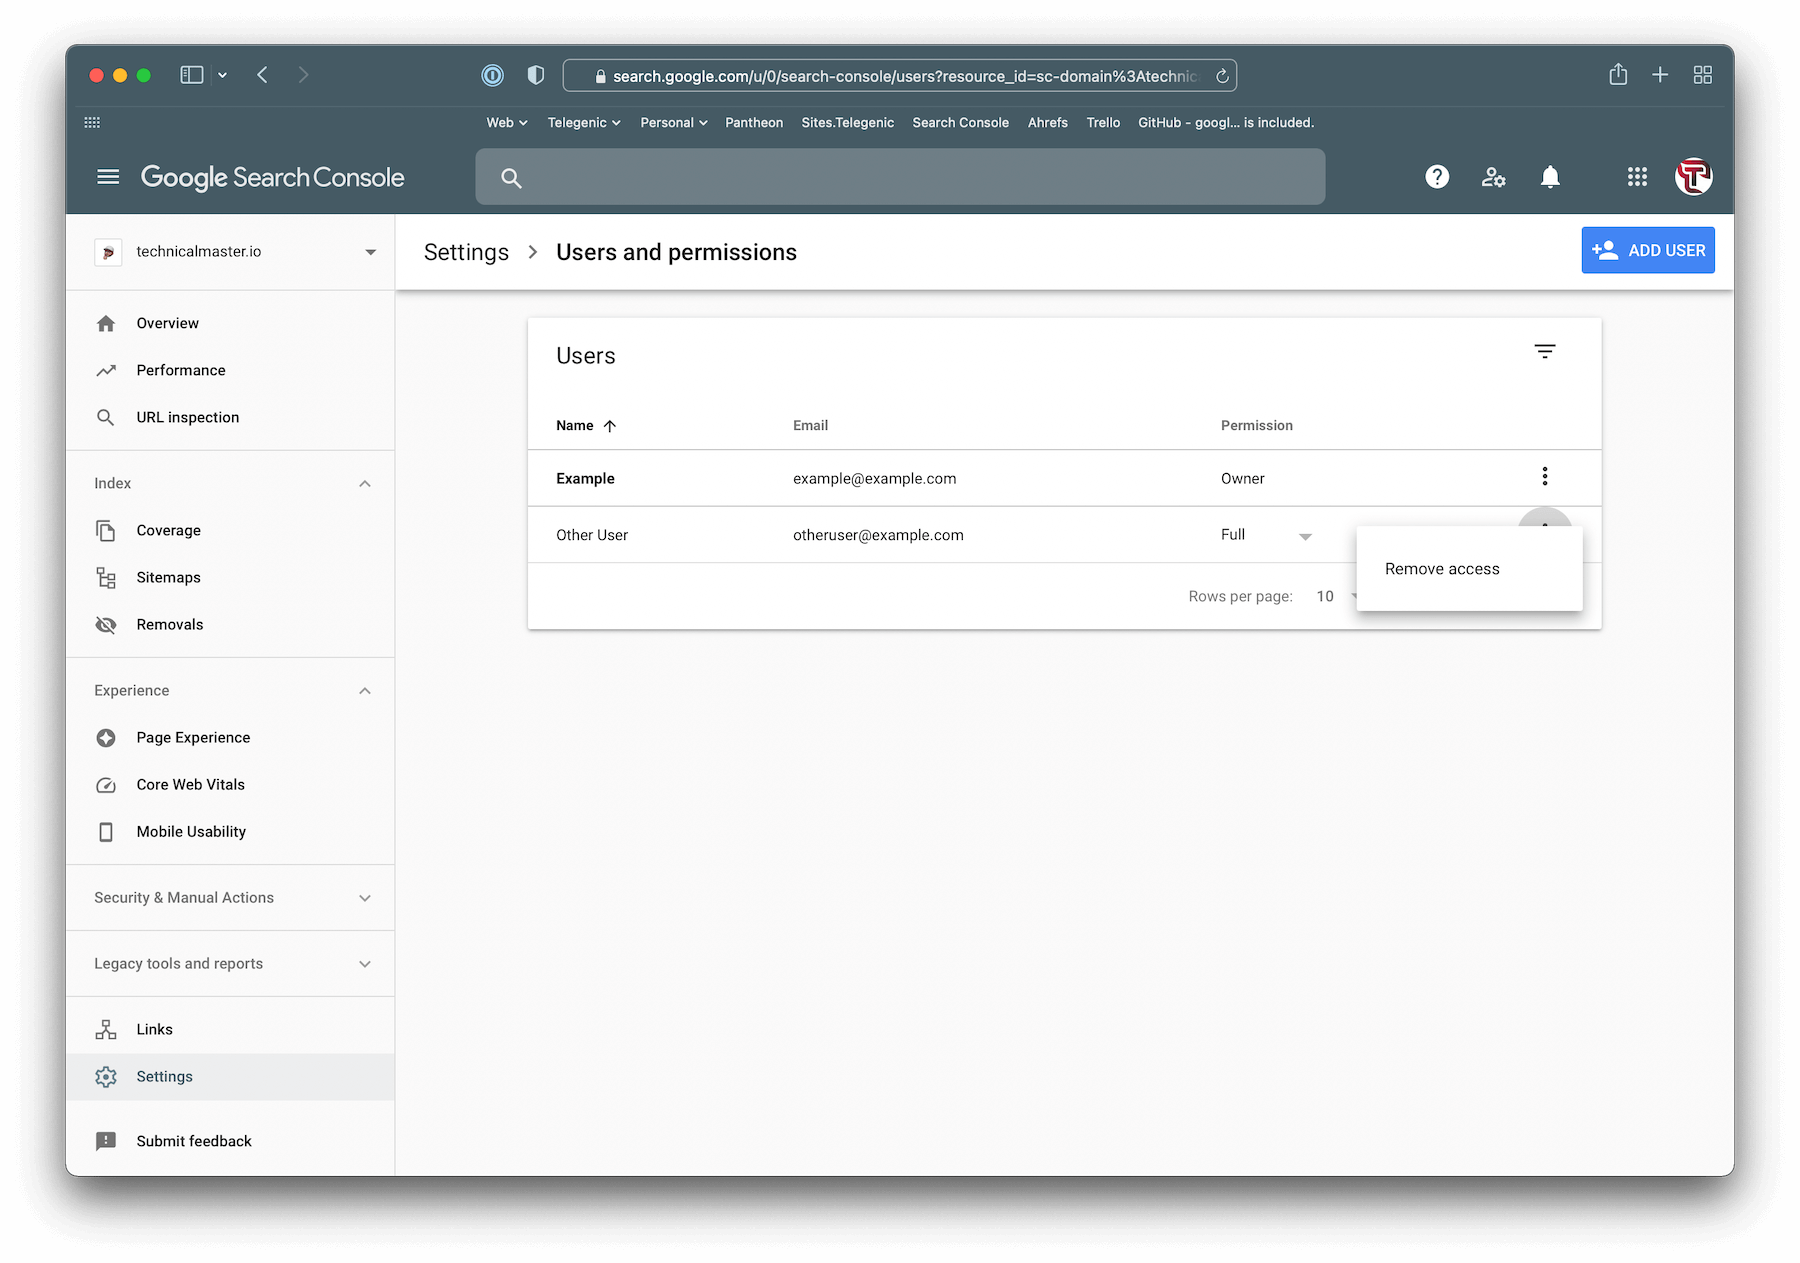
If you don't see the Add User or Remove Access features, you either don't have permissions, or your website isn't verified in Google Search Console.
To view verification, go back to Settings, and in the first box, there is Ownership Verification.
Other Settings
If you change your website's URL, add redirects and go to "Change of Address" in Google Search Console.

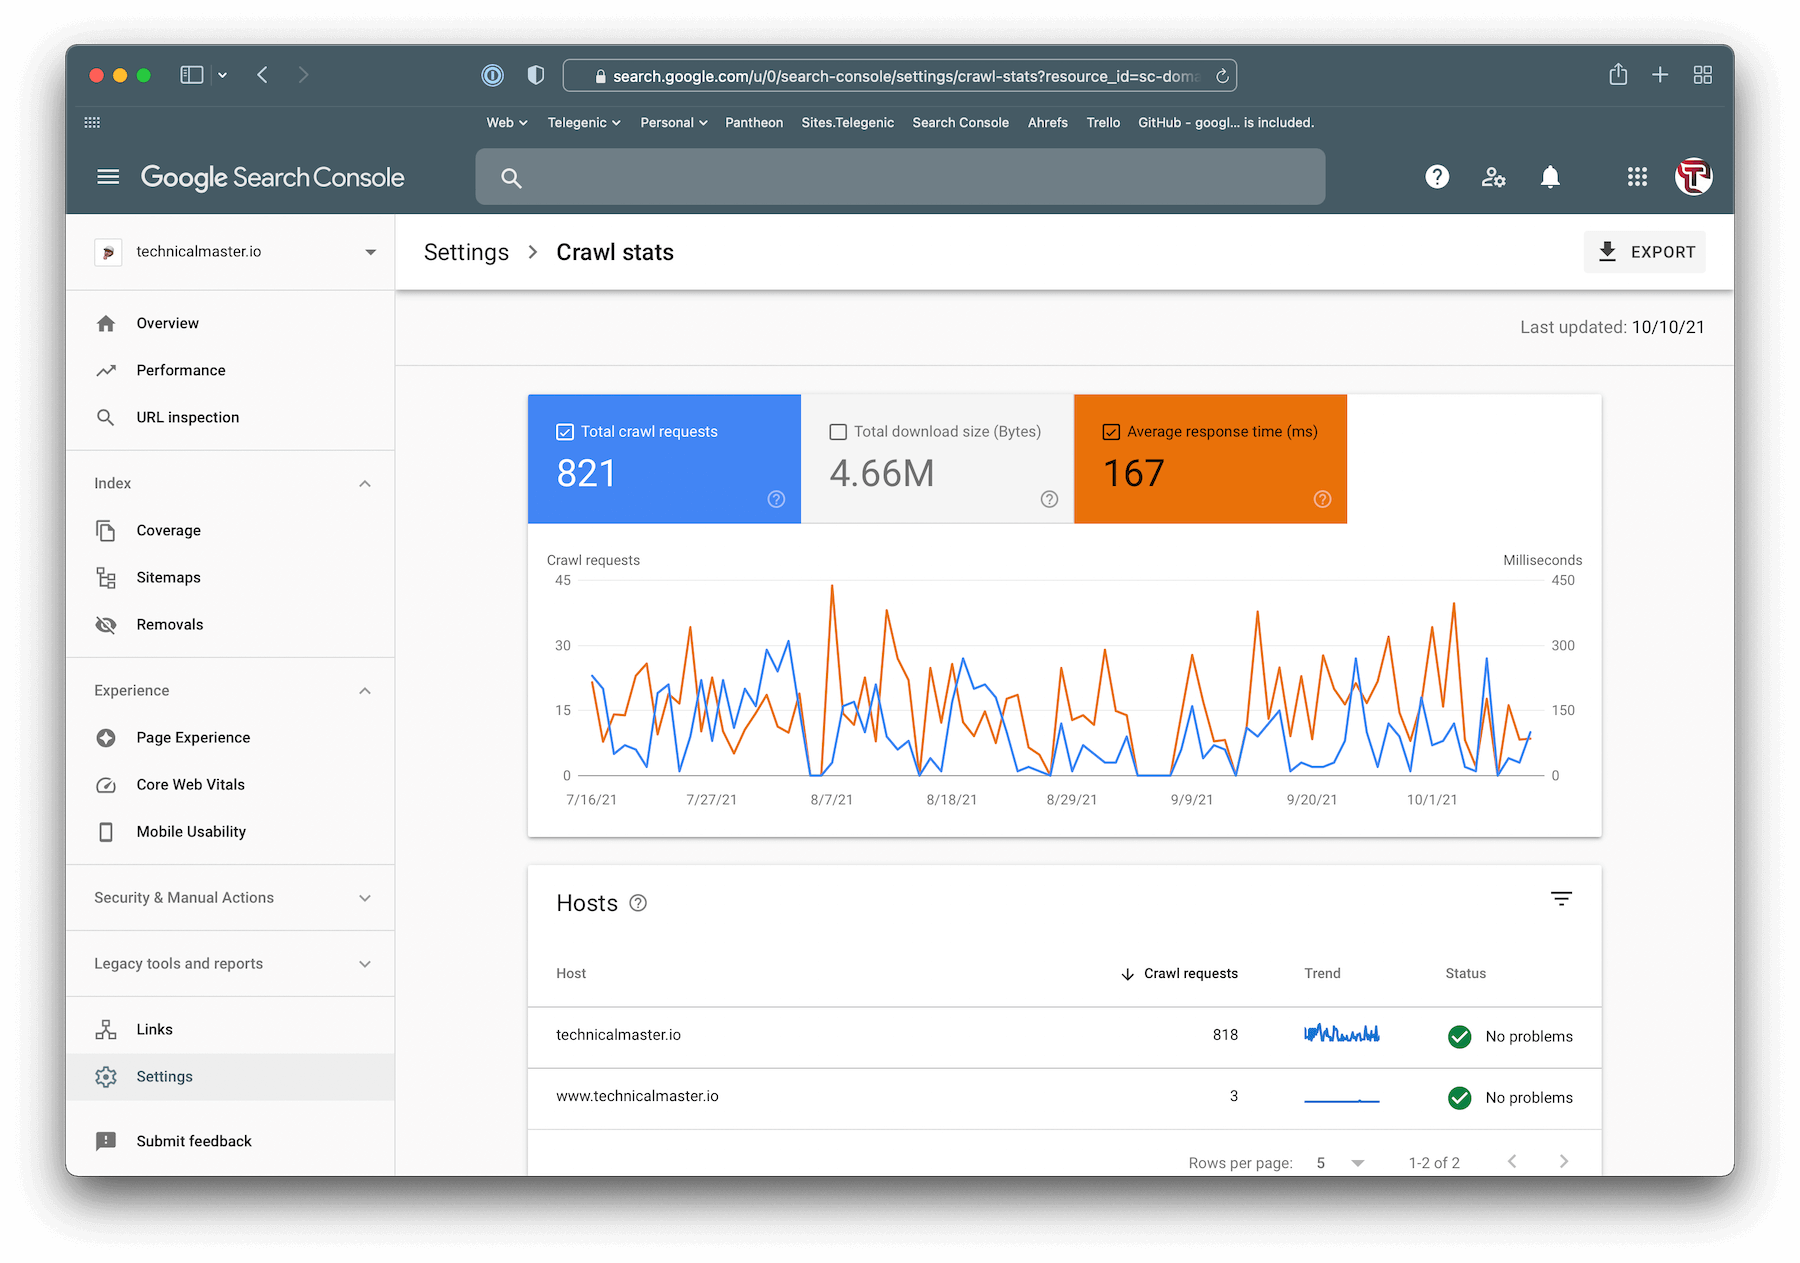
Lastly, you can view how often Google is crawling your website in Crawl Stats. You can also view the types of responses they are getting, among other things.
What you know about GSC?! A lot now! I hope this Google Search Console tutorial has helped you go from beginner to understanding how to use it and, most importantly, how to THRIVE with it.
I've also made an article going over advanced GSC features you might be interested in.
Happy SEOing!